Showing posts with label prima marketing. Show all posts

Wednesday, September 17, 2014

Mixed Media Card

I love to have cards on hand for any occasion, leave the front blank and you can write what you wish inside to have the cards fit for what you need.  for this card I can see myself using it for a teenage/tween girl birthday, think of you, thank you, or Valentines Day.


I used some of the wonderful Banner stamp from Susan K Weckesser to create the background to this card.  I then added in some May Arts Twine, Core'dinations cardstock, and Prima Flowers.

http://www.susankweckesser.com/susan_k_weckesser_incproducts


Supplies Used
Cardstock - Core'dinations
Patterned Paper - Kaisercraft
Flowers - Prima
Stamps - Susan K. Weckesser
Ink - Imagine Crafts & Prima
Twine - May Arts
Gems - Kaisercraft
Staples - Other
Mists - Heidi Swapp & Tattered Angles
Felt - Kaisercraft
Adhesive - Crop and Glue & Scotch & Beacon
Enjoy!!
http://scraps-of-reflections.blogspot.com/

Friday, July 4, 2014

Sweet

We took some pictures in the Texas Bluebonnets in March of 2014, our new stomping grounds.  It was so hard to try and get Catherine to look at me and not the flowers, but I finally got one shot where she looks at me and she is grinning with a little smirk just for me, littler stinker.

  
Susan K. Weckesser Stamps have so many uses, especially if it has anything to do with flowers or children.  I love the phrase "Celebrate the Simple Things" along with the horizontal triangle pennant see above.  I used the pennant all around the layout for added texture and dimension and to tie the two elements of the picture and the circle title together.

http://www.susankweckesser.com/stores_that_carry_susan_k_weckesser_incproductshttp://www.susankweckesser.com/stores_that_carry_susan_k_weckesser_incproducts
I also love the stamp set above with the phrase "Earth laughs in Flowers" stamped on the blue cardstock below.  It is just too perfect for this picture of her little smirk and being the flowers.


I played with the fantastic stencil of Susan K. Weckesser's below.  It has so many wonderful lines and shapes.  I choose the hash line on the far right around the edges of my layout as seen above.  I used gesso to create the lines with the stencil, then used paint, ink, and stains to make them pop.

http://www.susankweckesser.com/stores_that_carry_susan_k_weckesser_incproducts


Don't forget to stop and take time for those small moments in life - they are so precious and go by so fast!!

Supplies Used
Patterned Paper - We R Memory Keepers/Fancy Pants - Birds of a Feather June Kit
Cardstock - We R Memory Keepers - Birds of a Feather June Kit
Flowers/Butterfly -  Petaloo- Birds of a Feather June Kit
Buttons - Maya Road - Birds of a Feather June Kit
Bow - Fancy Pants - Birds of a Feather June Kit
Leaves and pearls - Petaloo- Birds of a Feather June Kit
Stickers alpha - Fancy Pants - Birds of a Feather June Kit
Stickers Other -  We R Memory Keepers - Birds of a Feather June Kit
Punch - Just Imagine
Stamps/Stencil - Susan K. Weckesser
Gesso - Ranger
Chipboard - Dusty Attic
Large Flower - Zva
Script Stamp - Hero Arts
Twine - American Crafts
Pearls  - Prima
Ink/Stain/Mist - Ranger/Heidi Swapp/Prima

Enjoy!!
 http://scraps-of-reflections.blogspot.com/

Wednesday, April 9, 2014

Plant a Little Love

I had these two picture of myself and my husband laying around for a long time.  We are about the same age (between 1-2 years old), the pictures are taken in the spring or summer, and we both just look too cute.  I have never done pictures of us from when we were little kids, and I could just not pass it up.


It is amazing how similar out son Brandon looks to my husband and out daughter looks to me at these ages.  It is just too fun to look back and remember.


Here I used the wonderful stamps from Susan K. Weckesser as background and accent pieces to the layout.  She has the cutest little set with flowers, a bird, and the saying "Earth Hugs in Flowers" and they all fit just perfectly. 

http://www.susankweckesser.com/welcome

Here you can see a close up of how I used the stamps around the layout to enhance the background and the papers.  I even stamped on the flower with the cute little bird.


Supplies Used
Patterned Paper - Paper House
Stamps - Susan K. Weckesser
Cardstock - DCWV
Flowers - Prima
Wood - Prima
Metal -Tim Holtz
Crystals - Spare Parts
Ink - Ranger
Paint - Ranger

Enjoy!!

Friday, March 14, 2014

Time Capsule

I recently lost my grandmother, so I decided to create an art piece in her honor. I created a time capsule with an old photo of my grandmother with her two twin daughters my mom and my aunt.


I created it from a making tape roll that reminded me of a clock's shape. I covered it with SKW patterned papers on the inside and out and also created the backing of the capsule.
I stamped the little SKW house stamp on white cardstock with archival brown ink. Then I covered the roof with clock's parts to compliment the time capsule theme. I colored the rest of the house with colored pencils. I cut it out and attached it to the capsule with a folded piece of cardstock.


I added felt green trees and my grandmother's photo which I cut.


I created grass by using double sided tape and green flower soft. Then I added embellishments like the picket fence which was sprayed with a copper spray, chipboard bicycle and chipboard birds on the top. I finished the capsule with colorful flowers.

This was fun and sad to create but I'm really happy with the result.

Have fun creating!
Einat

Thursday, February 6, 2014

Mixed-media cards with Whimsical Papers

Hello crafty friends!

Emmy here with a new post to share. This week I decided to create a few mixed-media cards using the amazing Whimsical Papers from Susan K. Weckesser and a few of her stamps. 


I used the Susan K. Weckesser Whimsical Papers - Beautiful Daydreams, Bouquet, Live in Color tags, Live in Color and Color Burst, and Susan K. Weckesser and Unity Stamps "abc.123.washi" stamp set.   

To create my background I used white cardstock, Gelatos, distress ink and different masking templates. I applied a lot of different layers of pastels, ink, stamps and modelling paste, until I was satisfied with the result.


All the washi tape stamps are from the Susan K. Weckesser and Unity Stamps "abc.123.washi" stamp set.


For my abstract flowers I used Susan K. Weckesser Whimsical Papers Color Burst. I cut out four circles, inked and distressed their edges and adhered them to my background with 3d foam tape. Then I cut out the stems from the Live in Color tags pattern paper, stamped the alphabet washi tape on top of them and attached them to the flowers. 


To finish off my card I added white pearls and I doodled the frame around my design.


For my second card I used a light brown card base and a 13 x 13 cm piece of Susan K. Weckesser Whimsical Papers - Color Burst. I adhered it to the cardstock and doodles the frame around it. Then using a masking template and modelling paste, I added extra dimension to my card. 


To create the banner I used I used Susan K. Weckesser Whimsical Papers - Beautiful Daydreams, Bouquet, Live in Color and Color Burst.


As a final touch I added two colorful butterflies, which I embellished with white pearls.


I hope you enjoyed today's post!

Make sure to come back tomorrow for more inspirational projects from our design team!

xxx

Tuesday, February 4, 2014

It's a Boy!

 I have a baby shower that I am going to this weekend, and it is for a boy!!  I love to make handmade items for people on special occasions such as this, so here is my special card for such a special baby.
 

I just love the colors of teal, turquoise, tan, and white - it looks so clean and fresh, just what I think of new babies.  I had fun with all the layers and textures here, from die cuts to ribbon, flowers, chipboard, and Susan K. Weckesser Stamps.

http://www.susankweckesser.com/welcome

I used the horizontal line triangle stamp from the "Celebrate the simple things" stamp set by Susan K. Weckesser, stamped it in light brown ink on tan Core'dinations paper and then cut it out and place it in the background of the card.  I added a bit of twine from May Arts Ribbon across the top of the triangle banner and added little knots to the end.


I then took the "Create your Day" stamp from the below stamp collection by Susan K. Weckesser and stamped just the "your day" portion of the phrase around the card in random places, as it is the baby's day for he is about to be born (and also for his parents).

http://www.susankweckesser.com/welcome


Supplies Used
Cardstock - Core'dinations
Patterned Paper - Simple Stories
Punch - Martha Stewart
Die Cuts - Spellbinders
Inks/pearls/glitter - Ranger
Ribbon/Fibers - May Arts Ribbon
Chipboard - Memory Maze and Other
Stickers - Momenta
Flowers - Prima
Brad - Recollections
Stamps - Susan K. Weckesser

Enjoy!!
http://scraps-of-reflections.blogspot.com/

Thursday, January 23, 2014

my sweet girl

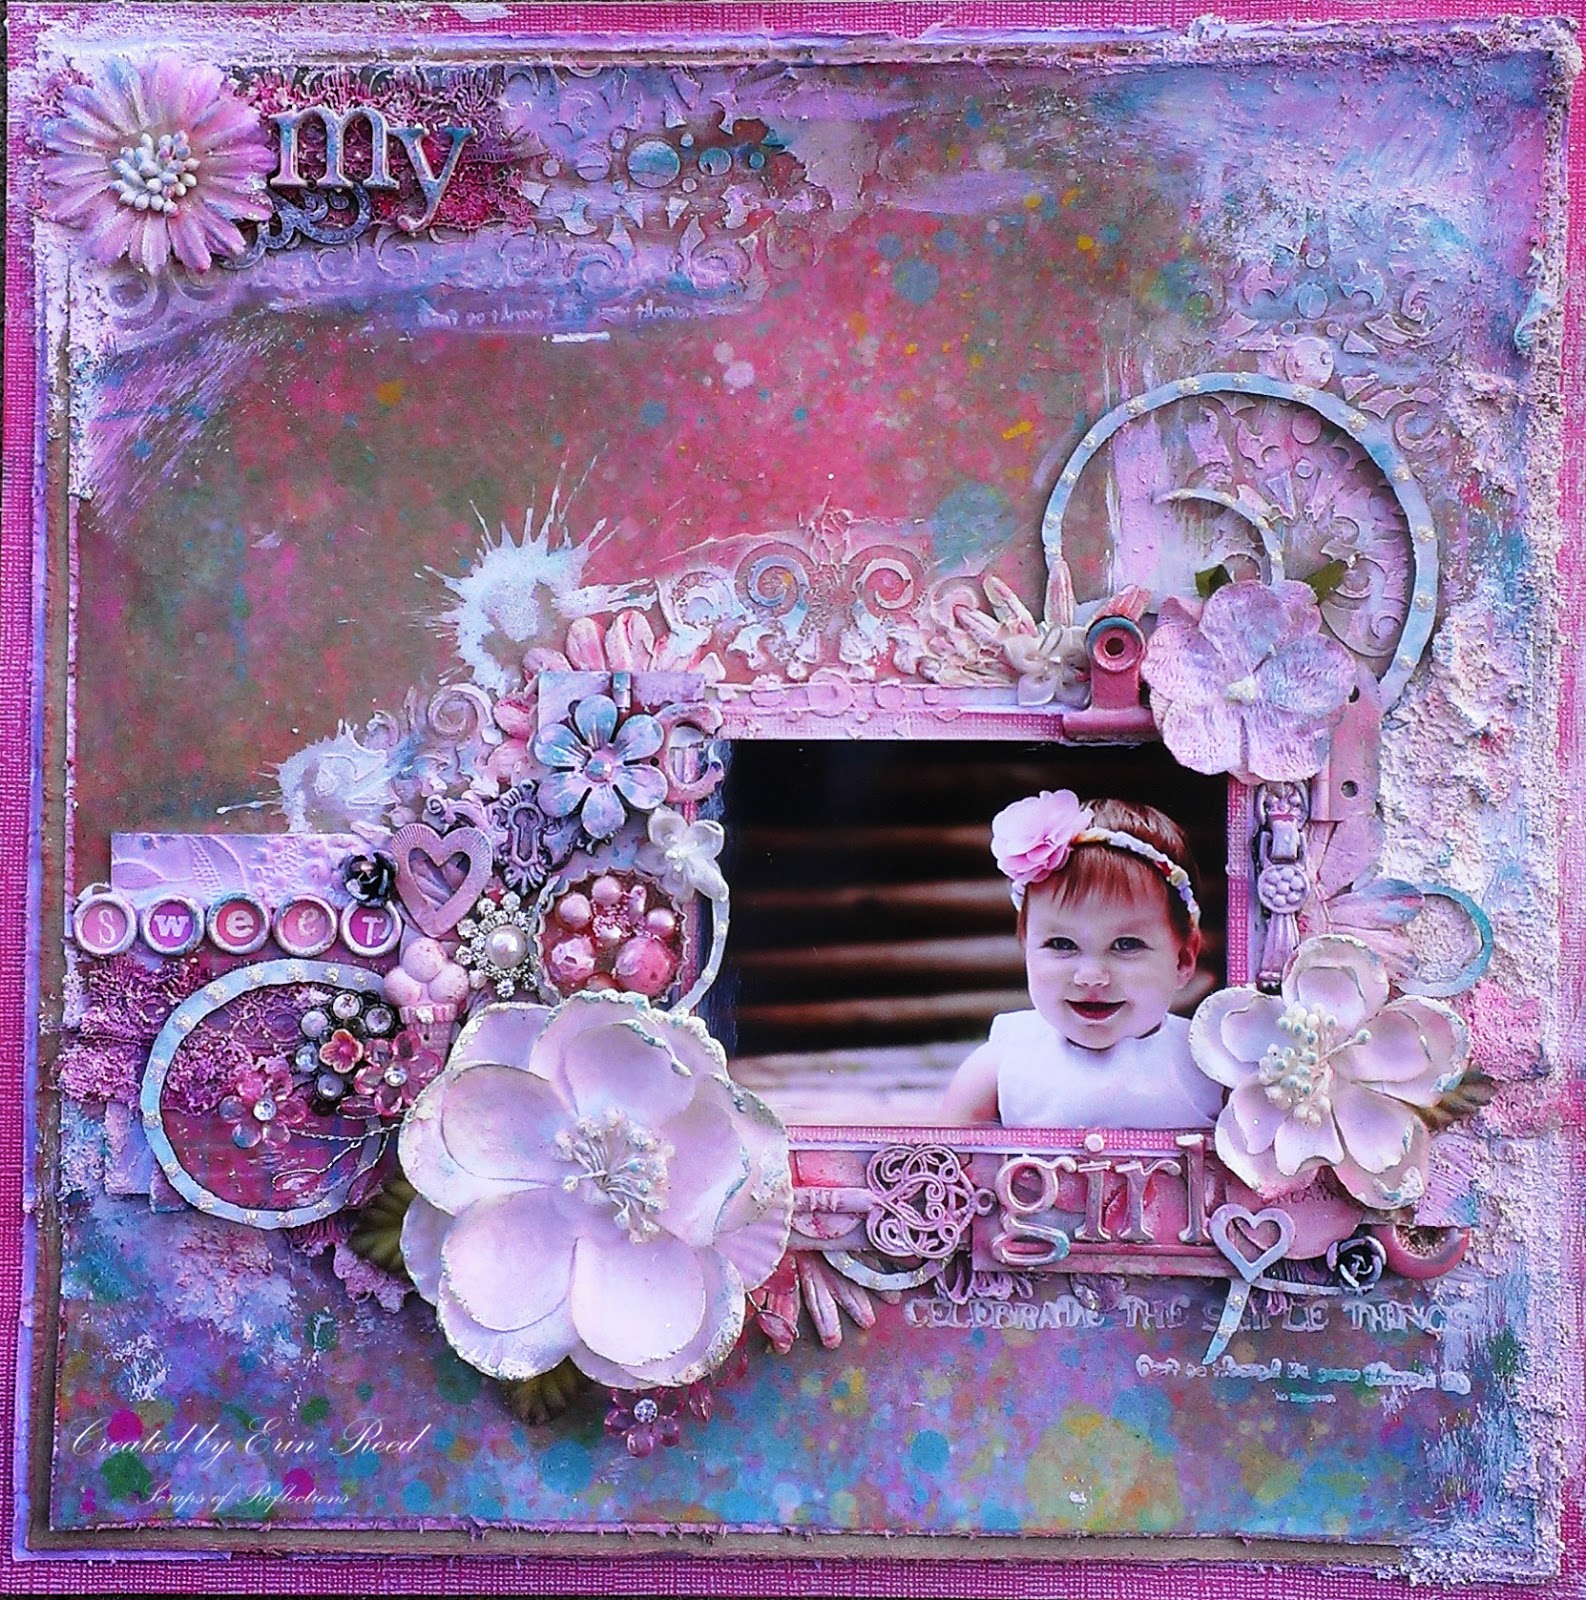
 For Catherine's first birthday we had a few pictures taken by a friend, and they turned out wonderfully.  This is one of the beauties that came out of that shoot.
 

I love the look of mixed media, playing with your embellishments, creating texture, looking around the page at all the fun different items, but never taking away from the picture itself.  That is part of the art, not letting the page "eat" the picture, but letting the page enhance the picture.  

Below is my methodology of how I build a page - a peak into my head so to speak.  Sorry for the lighting on some of the pictures, I did not always have the best light available as I was building my page.
How to Build a Mixed Media Page

 1) I start with the papers.  I look for papers that correspond to my picture, I want to complement it, not fight with it.  I used my daughter's hair bow (since the rest of the picture is brown, flesh, or white I used those colors (pink, teal, white, etc).  The papers from Susan K. Weckesser were a perfect match, they just begged to go with this picture.

http://www.susankweckesser.com/welcomehttp://www.susankweckesser.com/welcome
 The "color burst" paper was perfect for the background, and then I added in the "bouquet" and "beautiful days" as layers.

2) I this point I have a sketch in my head of the design of the layout, I know I wanted the picture in the middle right, with elements going above and to the left of the picture.  I start pulling items that I think will work on my page, not caring about color, just the shapes.  Not all the items will make the cut and be used, but this gives my an idea if I like where I am headed.  Nothing is glued down, it is just my rough idea at this point.


3) I apply gesso to all the embellishments that need a change of color (except for the top lace it was white so it took color no problem).  The spray them with spray mist.  I used Tattered Angels mist in a couple of different shades of light pink. I mist them each 2-3 times to give them a good coat.  I also let them dry before each coat so they absorb the mist better.  I do this off the page so I do not apply to much mist to the background papers.


4) Now I add texture to the page.  I used stencils by Prima with gesso, added in my papers (distressing each layer of paper with scissors and edging them with ink) and trims, and for fun I added in layers of Snowtex.  I gives this wonderful bumpy texture.  I even took a couple of
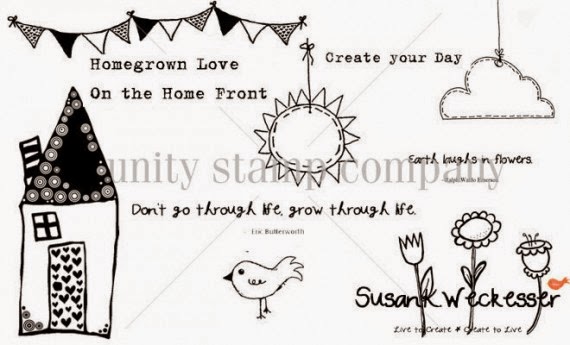
 Susan K. Weckesser stamps and stamped in gesso below the picture and in the top left corner below the lace and stencil area.  I used two small phrases found on the stamps sets below "Celebrate the simple things" and "Don't go through life, grow through life"

http://www.susankweckesser.com/welcomehttp://www.susankweckesser.com/welcome


5) Now I start to add my embellishments back on.  I do not have the picture glued down yet, as I might still spray and I don't want to damage my picture.


6) I start to glue down items as I like to way the looks in that location.  I sometimes take pictures and step away for the page to see how it looks a hour later (especially if I am waiting for something to dry).


7) If I feel there are dead or blank areas, I will either add in another embellishment (or two) or add in more texture.  I did this just above the picture, it felt it was missing something so I added another bit of stenciled gesso.  I also sometimes move things around or change the item completely.  I just let the page go with the flow.  I don't fight to make it work, because I find it never looks good if I do that.


 8) One of the last steps is to go over the gessoed embellishments one more time with paint or chalk ink, sometimes both.  This help them pop out of the page a bit.  I might even add a bit more gesso to the items so they don't look to pink. it adds contrast.  I also leave some items plain, or without gesso like bling and such.  On this page I also added on some glitter via Stickles from Ranger in Crystal for a bit of sparkle.


 9) You can see some of the texture and the Susan K. Weckesser Stamp


Supplies Used:
Cardstock - Core'dinations
Patterned Paper - Susan K. Weckesser 
Flowers - Prima and Petaloo
Media - DecoArt, O'Leary paint, Liquitex,
Paint, Mist, Sprays, glitter - Ranger, Tattered Angels, Martha Stewart
Metals - Prima, Momenta,  and Other
Chipboard - Memory Maze
Stamps - Susan K. Weckesser
Mask - Prima
Trims and Lace - Other
Found Objects - Other

 Enjoy!!
http://scraps-of-reflections.blogspot.com/
 Erin Reed Design Team Member

ShareThis2

BrendaPInnickColorCafe