Showing posts with label Fancy Pants. Show all posts

Monday, August 29, 2016

Grandma's Needlepoint Garden

Deb here with my last post for August - another Art Journal page. I chose to use the Susan K Weckesser stamp set Grandma's Needlepoint since it has always been one of my favorites. I embroidered as a child and then as a teenager. I was quite the hippie and embroidered all over my blue jeans !! My mother and her mother were both excellent seamstresses, so this set also reminds me of them.


To start the page, I swiped inks onto an acrylic block - Ice and Fresh, both from Susan's collection of Clearsnap Colorbox Color POP ink pads. I then applied the inks to my journal page using an ink blending tool and a stencil. The  Tim Holtz Doily stencil has a pattern reminiscent of the doilies on the arms of the chairs at my parent's and grandparent's houses.


The silver pattern on the Left side of the page was created with the Doodle stencil by Susan and modeling paste by Art-C. Inside each circle are flowers that I stamped, colored and fussy-cut. They are from Journal Doodles With A Heart and each are popped up with a dimensional. They are just SO cute !!


At the upper and lower corners of the Right side, I used some rub-ons that I have had for many years by  Fancy Pants Designs. The images of the girl, birds, butterflies and sewing stitches were all stamped in Mystery / Colorbox Color POP ink and colored with a variety of Distress Markers, Stabilos and Stampin' Up markers.

For the tag, I used an American Crafts Newspaper Tag and my old friend, Mod Podge / Gloss . I printed the words to the Monet quote, cut them out, then adhered them to the tag with a few coats of Mod Podge. I placed the tag on the journal page with Dimensionals. I hope that you like my last post for August. Art Journaling is out of my comfort zone but I really had fun creating this page. Stay tuned for a new theme in September from Susan's team !!


Stamp Set Used :


Debra Davison
Susan K Weckesser Creative Team

Monday, April 28, 2014

An April layout.

Well this is my last post as a Designer for Susan Weckesser and I've had a wonderful time here. She and the team have been the most patient, helpful, friendly and generous people you'd ever want to meet and the next team will be very lucky indeed.

It's time for me to move on but before I do I'm showing a layout for April made using Susan's Live in Color paper as a background and from the Happy Go Lucky paper line by Fancy Pants for the photo layers and embellishments.


It covers all the things I love, mixed media, colour, texture and fun so is a good way to go out.

Thank you Susan for having me it's been absolutely wonderful.

Jaine Drake for the Susan Weckesser Design team.

Friday, March 7, 2014

How to Create an Illusion of Dimension and Texture

I love to create texture and depth in my layouts.  I don't always want them bulky, but I want the illusion of richness and intrigue.  Here I will explain a few tips on how to add texture and depth using clustering and layering on your projects without added in tons of bulk, plus you might think about your supplies you already have in a different light and sue them in a different way.  

This is a layout of my family, it is a simple day fishing at a lake.  I love the picture because it shows my boys in the back ground fishing with my husband and daughter watching them, of course fishing as well.  I used a filter on the picture through Instagram called Walden, it gave the picture a softer feel, more like nature.  I have found that having a great picture to start with when making a layout, versus a picture you kind of like but "need to scrap" makes a world of difference.  The picture gives me the inspiration I need and the page just comes more naturally instead of fighting with the need to "just get this page done".

 
I wanted to have the same feel in my layout, so the first step was to pull items that worked with the color scheme of the picture, the browns, greens, the feel of nature.  I picked out items that had texture to them already like the mesh flowers, the chipboard, the wooden items, cork, and the fibers.  Using items that already have their own texture gives your projects more depth and richness without even having to try.


Here is a list of a few things to the edges of the papers in your projects to add texture and dimension without adding bulk to the layout.

  1. Distress the edges of the paper with a distressing tool like your scissors and ink the edges.  I do this technique to tons of projects.  It adds a softness to the look and takes away all the white lines from the papers you just cut.
  2. Take an edge punch and randomly punched the edges, not really caring that the punches were aligned or even that the paper looks like like the punch.  I did this the tan paper all around the edge of the layout and also to the darker brown paper placed vertically behind the cluster.  Just a pop of each paper is visible, so it adds just a hint but that little touch add so much.  
  3. Add in grainy texture by applying a quick drying glue (like ZipDry) around the edges of the papers and layers and sprinkle on flower soft.  I used a light brown color.
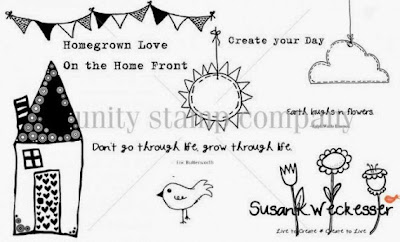
  4. Take some phrase stamps like those from Susan K. Weckesser saying "Create your Day" and "Don't go through life, grow through life" and stamp around the edges of the paper and at corners of strips in the foundation of the cluster.

http://www.susankweckesser.com/welcome


Here I used a wonderful stamp by Susan K. Weckesser that just captures the feelings the day "Celebrate the Simple Things"
http://www.susankweckesser.com/welcome


Here you can see some other texture applications I used in the cluster to add interest.
  1. Paint Splatters
  2. Stamps
  3. Layers of paper
  4. Inked edges of paper
  5. Distressed edges of paper
  6. Metal bits
  7. Crackle paint on chipboard
  8. Flower soft
  9. Rubons
  10. Items with texture already like the flowers and the jute.
  11. Mists
  12. Paint Splatters


Don't be afraid to try out an item in a new way or add things together to create something new.  Layers of papers mixed with other items add such a wonderful depth to your projects.  I have been told before and I fully believe there are no mistakes in scrapbooking just chances to expand your creativity!! 

Supplies Used
Cardstock - Core'dinations
Patterned Paper - Prima
Number Stickers - Glitz
Rubons - BoBunny
Jute - Canvas Corps
Flowers - Petaloo
Wood - Prima
Chipboard - Memory Maze
Metal - Prima
Cork - Fancy Pants
Stamps - Susan K. Weckesser
Ink - Ranger
Punches - EK
Stains and Mediums - Ranger

You can also view this article at Susan K. Weckesser.

Enjoy!!
http://scraps-of-reflections.blogspot.com/
Design Team for Susan K. Weckesser

Wednesday, January 8, 2014

Tickled Pink

When I saw the papers that Susan K. Weckesser designed I fell in love with them. Literately I saw the heart design on her papers and thought it would be perfect for a Love/Valentines Day card.


I went for mostly pink in this card, it really helps tie everything together, plus with it being a Valentines Day/Love card pink was just perfect.  I added in patterned and corrugated papers from Fancy Pants, they worked perfectly.  Covered parts of the papers with Snow Tex to give it texture, waited until it dried and then sprayed it with some pink Tattered Angels Glimmer Mist.  Added in some bling, chipboard, flowers, and some twine from May Arts Ribbon and poof you have a pink card!

http://www.susankweckesser.com/susan_k_weckesser_incproducts

I cut out the top right section of the "Live in Color Tags" paper that says "Tickled Pink" by Susan K. Weckesser.


Around the heard on the tag I used ClearSnap Smooch paint in molasses, let it dry, then added little dots of Ranger Distress Stickles in Tattered Rose.  To the words "Tickled Pink" I added a couple of little dots of light pink puff paint to each letter at random.  Using your Stickles, puffy paints, and Smooch paints are an easy way to spice up tags and paper.

Supplies Used
Paints/Glitter/Mist - ClearSnap, Ranger, Tattered Angels, and DuncanCrafts
Flowers - Prima
Crystals - Recollections
SnowTex - DecoArt
Brad - Spare Parts
Chipboard - BoBunny

Enjoy!

http://scraps-of-reflections.blogspot.com/

Tuesday, December 24, 2013

Santa's Message Board

Twas the night before Christmas, when all through the house
Not a creature was stirring, not even a mouse.
The stockings were hung by the chimney with care,
In hopes that St Nicholas soon would be there.


Preparations had begun with the stocking on the mantle and milk and cookies place right beside....then the kiddies exclaimed that they wanted to leave Santa a message when he came to our house!  So I whipped up a message board so we could shout out!  (Ok if you have not realized yet I suck at poetry)

First I found a white picture frame that was lying about.  I removed the back and cut a piece of Fancy Pants paper to fit the inside.  I closed the frame back up with the paper inside.


I then cut out from another piece of paper the three Christmas trees that were on it.  This was glued to the frame and glass.  I added two Want 2 Scrap flourishes onto the frame and glass as well.


I then stamp Susan's snowman onto glossy paper, cut him out, coloured him in and pop dotted him onto the trees.

I then took various Fancy Pants stickers and added them to the cluster and top of the frame.

I also added a flower, leaves, buttons and bling to jazz it up!


Now you can write in the glass with a water marker or dry erase any messages you would like to leave for Santa or other people in your family.


At the end of the season wipe clean so it is all ready for next years message.  A cute idea not only for Christmas but you can make an everyday one that you can leave messages on, shopping lists etc.

Hope you enjoy!  Merry Christmas and happy holidays!

Jennifer

Monday, December 23, 2013

Merry Christmas Card

Every year I love to hand make Christmas cards, some I make quick and easy and some I spend more time on, it really depends on who I am giving them to knowing if they will keep them or not.  My mother and mother in Law always keep the cards, tags, and such that I make so I love giving them my special ones.


Here to went with a monotone color scheme, green.  I then added in colors of beige, gold, and grey to match with the papers I was using.  I wanted to give lots of texture, so I added in the wonder burlap tag by Canvas Corps in my layers, plus some corrugated paper from Fancy Pants in grey.  I then added in lots of layers of patterned paper for even more depth and dimension.


I wanted to add something more behind that back drop of the "Merry" word, but more have it ass bulk - enter in stamps!!  I stamped the wonderful flag banner stamp from the "Create you Day" collection from Susan K. Weckesser stamped in gold by Ranger.  It added that perfect pop and texture needed!!

http://www.susankweckesser.com/susan_k_weckesser_incproducts 

 To round it all off I added some leaves, flowers, and a die cut ornament to finish the card.  It does add bulk and dimension, but standing up on a mantle or a table with other Christmas cards this sure does stand out!


 Merry Christmas!!

Supplies Used and can be purchased from Flamingo Scraps
Patterned Paper - Basic Grey
Die Cuts - Basic Grey
Flowers and Leaves - Prima and Maya Road
Acrylic word - Heidi Swapp


Design Team Member for Susan K. Weckesser

Sunday, December 22, 2013

Birds of a feather - Anita Bownds

hi everyone 
Happy Holidays
i hope everyone is super excited for Christmas day i know i am..
spending a fun day with my family

this layout is of my beautiful bird nubby hes a long billed Corella
he talks all the time


im using more of our sponsor product for the CLC

Fancy Pants Designs - Happy go Lucky
Susan K. Weckesser Stamps

other product used
Kaisercraft stencil
Silhouette Cameo cut
brilliance ink - Galaxy gold
glitter, machine stitching ,button ,doily , mini peg , cotton
mont marte - modelling paste


Crafty hugs
Anita

Wednesday, December 18, 2013

An ATC with a Message for Santa!

Susie here today to share an ATC with a message for Santa!  I am totally crushing on the sweet little girl image in Susan K. Weckesser's Grandma's Needlepoint stamp set from Unity.  She is the perfect size for an ATC (Artist Trading Card) and I think she looks like she has something she wants to say!
Here are the "how-to" details:
I die cut and embossed an ATC using the new Tim Holtz Kraft-Core Shattered Collection from core'dination and a Spellbinders die.  I used an emery board to rough up the edges and reveal the kraft core.

I stamped the little girl on white cardstock with black Archival Ink then cut and embossed it before adding color to the image. "dear Santa" was also stamped in Archival Ink.

The Christmas Tree die cut and the phrase stickers are from Fancy Pants Designs and I "popped" them up with some foam dots to add a little dimension.  The final step was to add a few self-adhesive red rhinestones from Want2Scrap on top of the holly berries.

Here's another look at the finished ATC - I sure hope Santa is listening!!


Thanks for stopping by - I hope you find some time to play today!


Susie Bentz
Susan K. Weckesser Design Team Member


Susan K. Weckesser Products for Dear Santa ATC:

 Other Products:

Thursday, December 12, 2013

Happy Holiday


Hello~ everyone!

MIYAKE here again.

When I was a kid, I believed Santa and Rudolph is flying in the blue sky.

It's Santa's gift to throw in my socks.

I love this!


Merry Christmas!
Happy Holiday!


ShareThis2

BrendaPInnickColorCafe