Showing posts with label tags. Show all posts

Saturday, January 28, 2017

Tend To Your Soul

I love writing letters and postcards. Snail mail has always been a big part of my life by keeping me in touch with friends near and far, especially before the days of e-mail. Even now, I don't think e-mail can come close to the feeling of holding a letter in your hands and anticipating what is inside the envelope. 

I have been fortunate to become involved in the Love Notes Postcard Project , started by Jennifer Belthoff. I learned about it through their Love Notes Facebook Page . It is hosted quarterly and each Sunday for 3 weeks, you are sent a prompt. You then write a postcard to your assigned partner. I hope that you will check out the information for this project and join us as we make some amazing connections.

One of the prompts this Round was " I invite you to tend to your soul ". Instead of making or writing out a postcard, I decided to make a set of tags to remind my partners ( I had 2 this Round ) of ways to take care of themselves.  I used my stash of tags from FLOW magazine along with some perfect stamps by Susan K Weckesser. The wooden tags and Butterfly tags were purchased at Michaels on clearance. I tied them together with some colorful twine. The Special Delivery stamp is by Hero Arts and the  Heart Made stamp is by Rubber Moon.


Stamp sets used "

I believe it is so important to take care of ourselves, tend to our souls. We work, have families, take care of so many things.Yet, I think that sometimes we forget to take care of ourselves. Read a book, take a nap, meet a friend for coffee. Just do nothing !! Write a letter or postcard to a friend. Hang out at the bookstore. I just that did yesterday and it was a fabulous way to  re-charge my batteries after a long stretch at work. I know that being creative tends to my soul. And sharing in my creativity hopefully tends to yours too !!


Love Notes mail received 1/2017


Debra Davison
Susan K Weckesser Creative Team
Thank you for visiting { My Sweet Earth }


Sunday, November 27, 2016

A One Of A Kind Tag for A One Of A Kind Winter...

Happy, Happy Day Everyone!  Today I am sharing an oversized mixed media tag created for my second Susan Weckesser design team project for November.  Tag making is something I have not done a lot of in the past, but I am loving it because this year I realized that: a) you have a tag which can be used instead of a card; b) that a blingy tag is such a beautiful decoration, you can wrap your gift in brown paper and it still looks good and c) you can hang it on the Christmas tree as an ornament and a memory.  Seriously Christmas tags may be replacing my Christmas cards next year!
I created this tag for a special, extra Large Gift for someone wonderful, featuring my very favorite "One Of A Kind Winter" snowman stamp  from Susan Weckesser/Unity Stamps.  I Stamped the snowman onto a piece of cardboard that came with a stamp set I bought, because I loved the subtle embossed dots on it, and I colored the hat and scarf using my Zig clean color brush tip markers.
For the background I applied a thin layer of white gesso and I stamped the small house from Susan's Create Your Day Unity Stamp set onto a page of thin white paper from a second-hand medical book I bought for $2.  The paper in medical books or Bibles is wonderful for this technique, tissue paper thin and brilliantly white, it is strong enough to hold up to getting wet with Mod Podge and sprays and mediums. 
Some seed pearls for door knobs, a foam pop dot for the sun and of course the final step with everything I do, a layer of Rangers Stickles and Close To My Heart Liquid Glass finishes everything off.
So that's my tag for today.... I hope it inspires you to go off and create something that will "Warm 3 Winter Months" for someone!
Lynne Mizera, Mixed Media Artist
for the Susan K. Weckesser Design Team
 

Add caption
Create Your Day
"One Of A Kind Winter"

Tuesday, November 15, 2016

Tagging You @ Christmas

I've been thinking and thinking outside the box to come up with a different kind of tag for this post. I had several unique ideas along with many traditional ideas. But then I saw a tag in a small acrylic globe that was made by my friend, Carly Pool and I knew I wanted to try one of my very own !! I think my days as a counted cross-stitcher helped me immensely with working in a small space. And my handy dandy tweezers !!  I was happy with the finished result - which believe me, does NOT always happen when I am trying something new and different. A big shout-out to Carly for the inspiration !!


  • I started with the Very,Very Merry stamp set and stamped the bird image with  Colorbox Color Pop Mini ink in ICE.  A simple tree shape was cut out of Susan's Live In Color paper and I adhered it to the inside back of the globe with some mini Glue Dots
  • I took 2 3D Glue Dots and formed them around the bottom of the bird image, almost like a nest. I played with the Glue Dots until the bird stood up and didn't fall over. I then carefully placed the bird on the bottom of the globe using tweezers. 
  • Artificial snow was then put into the globe using a small funnel and positioned around the bird. You could also use a small Dixie bathroom cup to put the snow into the globe. 
  • I attached a small pink ornament to the hanger with Maya Road Pink Lemonade Twine Cording.  This cording is also perfect for attaching the tag and also using it to hang it as an ornament if you'd like. For the picture, I sat the globe on one of my new favorite washis by Scotch which are now available at Target. ( I bought 6 different designs !! They had many more ).
I hope that my "outside the box" tag will encourage you to create something new. My teammates have created some gorgeous tags this month already and I am working on more for my next post later this month. Thank you for visiting { My Sweet Earth }.


Debra Davison
Susan K Weckesser Creative Team


Friday, November 11, 2016

Love Ya Whole Bunches tag with Color Pop Mini Inks


Hi all

 I have a tag to share made using the Clearsnap Color Pop Mini inks.


I created the background by Mixing Sky and Night inks together and adding water so i could paint them onto the tag. Once dry i then applied gesso to the tag with a stencil.


I used the Love Ya Whole Bunches Stamp set ans used the color pop mini inks to color in the girl. I mixed the Snow and Kiss inks together to make a pink color, 


I took the MDF shape and painted gesso over it and then used a sponge to apply the Fresh Ink over it. I varied the strength of the color to create a faded effect.


I then use the A Little Bit Washi stamp set with Night and Fresh ink and stamped onto white tissue paper before layering them over each other like a collage.

Tuesday, November 8, 2016

Rustic Tree Slice Tags

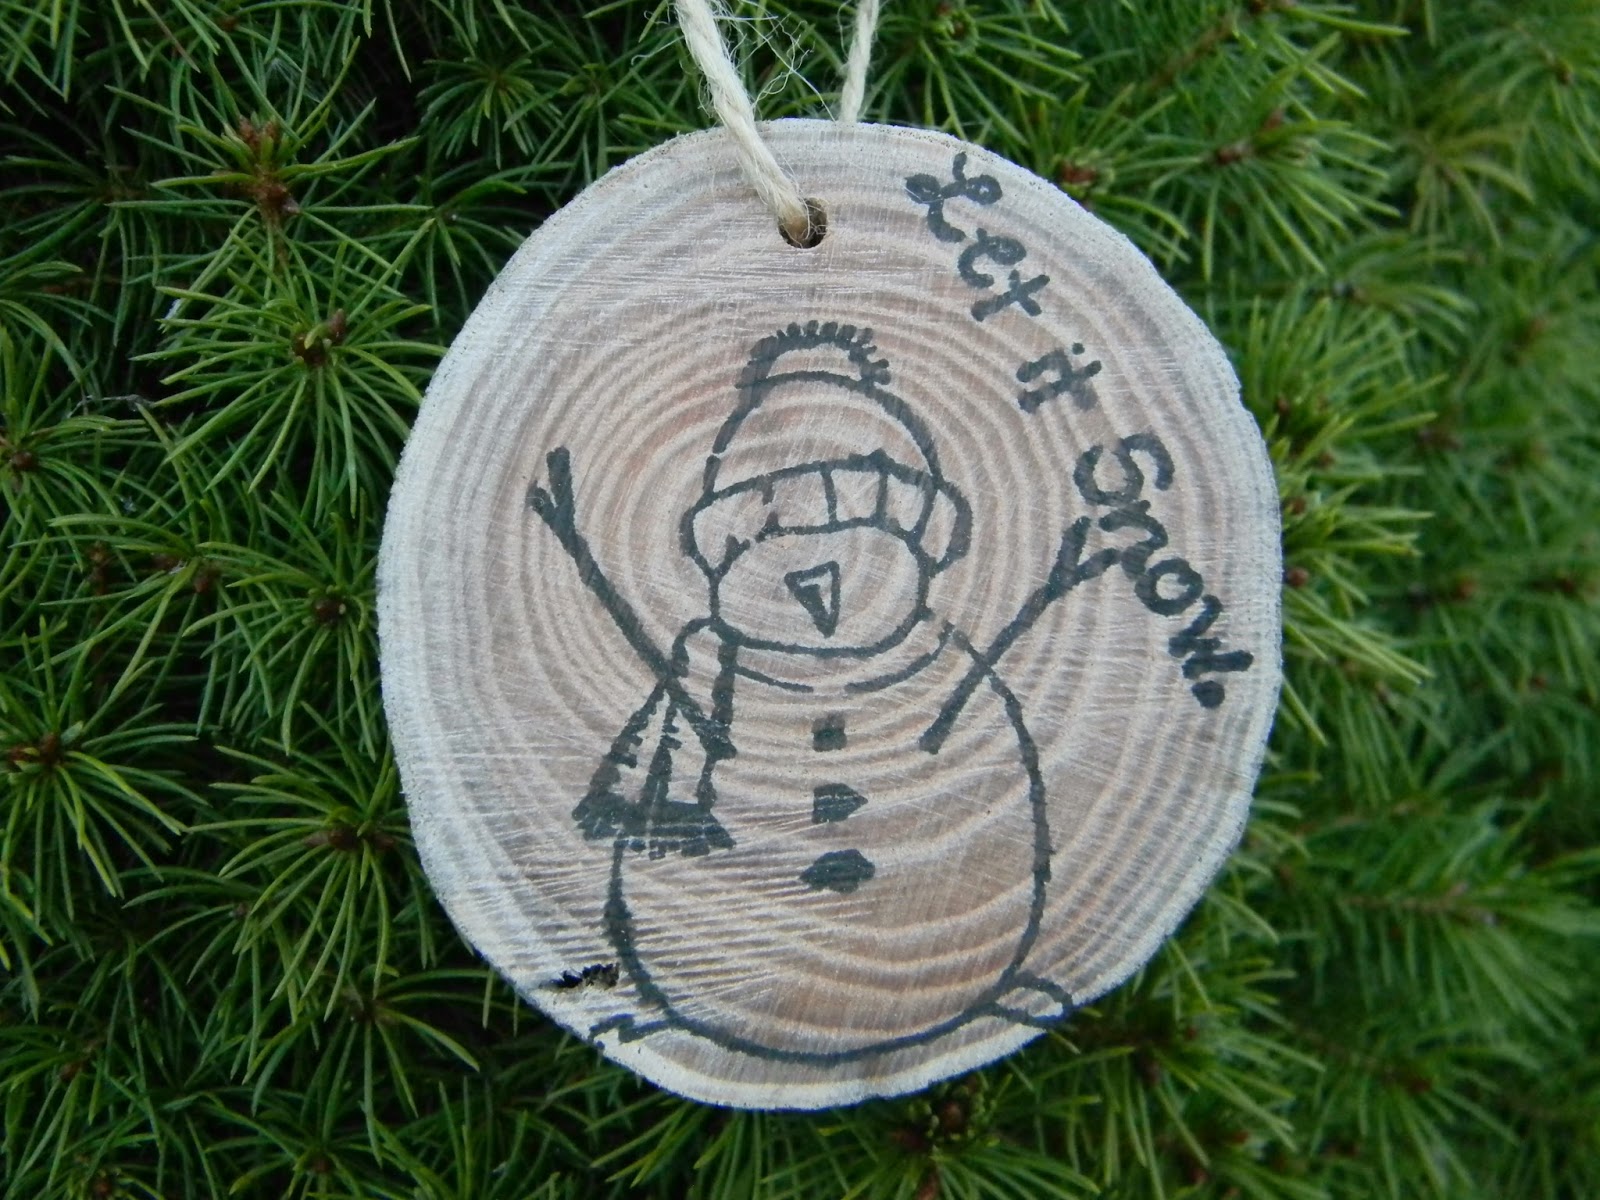
Hi there folks!  Brooke Bock here today.  This month we are all working on tags.  When I think tags, I think pretty little ways to mark presents.  With Christmas coming, I wanted something simple and rustic that would be usable after the holidays.  So I broke out the power tools and a log from the wood shed and some of Susan's stamps to make one of my favorite projects yet.


I mean, really....How cute are these?  I love the woodland creatures from the Going Wild Set and What's Up Gnomey? set.  They both seemed perfect for this project.


And for the holidays, this little snowman from the One of a Kind {Christmas Campaign} fit the bill.


So to get started you need wood rounds.  I cut mine myself from a log, as I mentioned and sanded them on the belt sander.  You can buy a bag of them at the craft store or kindly ask your woodworker friend to slice off a few for you. Drill a hole in each one with your drill or a drill press.


And then simply stamp each design with Susan's Color Box Color Pop stamp pad. I used Whisper.  I like the simplicity of black but the colors would be fun too.


Seriously, these took seconds to make once I had the wood rounds.


And the great thing is, I can just write the person's name on the back and attach it to their package.  I am  a huge fan of brown craft paper for gift wrapping.  These will complement it nicely.  and after the packages have been opened, these tags will not go in the trash....  No way!


They will make cute tree decorations for years to come.  I love that.  No waste for the landfill, took me a tiny bit of time and they are so adorable thanks to Susan's whimsical designs.


Hope you love them too.

Brooke Bock from the Susan K. Weckesser Design Team 2016.

Wednesday, September 7, 2016

Hello!  Brooke Bock here again!  Today's cards come to you from my scrap tubs.  I seem to save every little scrap and bit of paper so I hauled out 2 little tubs to see what I could put together.

I started by stamping some coffee stained tags with word stamps from the Painted Sentiments Stamp Set and the Colorbox Color Pop Minis Stamp pads.  Two I stamped right on the tag and one I stamped a scrap and glued it on the tag.


You can ink the edges of the paper and tag.  I do this by running the paper right along the edge of the pad.


Or you don't have to.  That little scored piece of card stock adds interest and texture. Plus every card can use a bit of bling.


The little heart on this one is from the Heart-full Homes Stamp Set.  I added a bit of ribbon and a punched scalloped circle.


This one used 2 punched circles: one above and one below.


Thanks for taking a peek at these quick little designs.  Scrap designs are my favorites. 

Brooke Bock: Susan K. Weckesser Design team member 2016.

Thursday, August 11, 2016

Mini Tag Journal Using At Ground Level Stamp Set from Susan K. Weckesser

 Hello Folks!

I am thrilled to show you this fast and easy tag book I made this month.

I am still enjoying my new studio space.  It is a great place to create.  Many of my supplies and tools are right at my fingertips which makes creating easy and fun.


I started by stamping some shipping tags with 

Colorbox® Color Pop Premium Dye Ink by Susan K. Weckesser in Fresh.  For the first one I stamped directly on the tag.  For subsequent ones I stamped my acrylic block and then pressed my tag onto it.  I used a baby wipe to smear the color all over the tag before it dried (and to clean up my block).  Then I wadded up my tag and smoothed it out.


 Next, I used stamps from the At Ground Level set to stamp each tag. I added word stamps from the An Artful Ornament stamp set for one of the pages as well.


Then I just had fun by adding some extras with the Doodle Stencil, trims, and some more of the 

Colorbox® Color Pop Premium Dye Inks by Susan K. Weckesser. I used a tassel from my trims box and a piece of ribbon I removed from some flowers to loosely tie the tags together.


This would be such a fun project to do with your kids one afternoon.


I love shipping tags.  I buy them by the huge boxful from office supply stores.


I often tea dye them though I actually use coffee. I also dye them using dye and a ziploc bag.  I do them in large batches so they are ready to go when inspiration hits.


For this project I used:
Lace scraps
yarn scraps
 pieces of ribbons

Colorbox® Color Pop Premium Dye Inks by Susan K. Weckesser

At Ground Level Stamp Set
An Artful Ormanment Stamp Set
glue/adhesive
Scissors


Brooke Bock, member of the 2016 Susan K. Weckesser Design team.

Wednesday, August 10, 2016

Grandma's Needlepoint Bookmark Tags

Hello friends. Larissa here with some cute bookmark tags I made using
Grandma's Needlepoint Stamp Set. 

I used some precut tags I had in my stash and stamped each of the images and sentiments on the different tags with Colorbox Color Pop Archival Dye Ink by Susan K Weckesser. 

I colored in each image using Prismacolor Pencils blending the color with OMS.

I kept the tags flat and didn't add a bunch of bulk since I would be using them as bookmarks. I left them clean and simple. I really love this stamp set. Reminds me of cards I use to get from my grandparents when I was growing up.


I hope you enjoyed my post today. Have a wonderful crafty day friends.
 

Tuesday, July 19, 2016

Summer House Project Bucket List

Hello all!  Brooke Bock here with my very first project for the Susan K Weckesser design team.  I am thrilled to be a part of it...

I recently finished a summer studio space.  I have clean counter tops which is a rarity for me.  I wanted to create a Summer Bucket list for projects I have for our house and yard and I have the perfect spot picked out on the counter top for it to keep me inspired to get all those projects done.


I started with an old Reader's Digest book that was being discarded at a local book sale.  I removed the cover for another project and then carefully folded each page in half.  This is a great way to enjoy a movie and some inside time when it is hot outside.  Once done, it is so versatile.


Next, stamp your designs using the Tumbleweed Houses set and the Mystery Stamp pad.


Next, color them in. After they are colored, punch out each house.


Here comes one of my favorite tricks. Get out all those lovely Susan K. Weckesser Color Pop Mists and all the images you just punched out.


Ink the edge of each circle.


That one simple step makes them pop.


Next, punch some circles from the Color Burst paper.


Adhere the Color Burst circles to the backs of the house images.  Write each task on a tag.


Next, place them in your book file.  As I complete each task, I turn the tag around.  Having them on the counter top  reminds me of my goals. You could easily adapt this project for any other bucket list.


Brooke Bock...Susan K. Weckesser Design Team Member


ShareThis2

BrendaPInnickColorCafe