Showing posts with label recycling. Show all posts

Monday, July 18, 2016

"It Takes A Village" Mixed media wood blocks


Hi!  This is Joyce and I am excited to be part of the Susan K. Weckesser Design Team.  Mixed media and recycling is a passion of mine, so today I would like to share with you how to create your own village using the wonderful new mini-pop inks, stamps, and scrapbook paper that Susan has created. 

For this project, I used recycled children's wood building blocks.  I made mine reversible, and the roofs can be switched around also.  Another idea would be to make a holiday house on one side and "everyday" on the other.  You can use any size, shape, or combination of blocks, so get creative and have fun!


First, choose your blocks to make a little village.  Slice larger blocks in half on the bandsaw to make roofs.  


Next, tear up strips of old tissue patterns into sections approximately 1" x 3".  Using a foam brush and Decou-page, glue on tissue pieces to cover all sides of your houses and roofs.  Be sure to overlap edges a bit.  Let dry.
 
 
Take your mini-pop ink color and swipe it on all sides of your wood piece.  This covers quite easily and is bright and vibrant.  When dry, use Mystery for a vintage look by swiping the edges.  Continue with all colors until all blocks are colored.


Ink up the Celebration of Simple stamps with the mini-pop inks and stamp onto the Colorburst scrapbook paper for the roof fronts.  Cut out triangles to fit your blocks.  Adhere the pieces with the Decou-page.


Trace the house block shapes onto the Colorburst paper and cut to fit the blocks.  Use both sides of the paper for variety.  Glue the rectangle pieces with Decou-page onto the blocks. 
 
Drill holes 1/4" into roofs for chimneys (screws or springs) to fit.   


With the Doodle Stencil and a cosmetic sponge, pounce Decoart paint colors on house fronts and backs.  Use coordinating paint colors with the mini-pop ink colors.  Let dry.  Using the Mystery ink, go over edges of scrapbook paper. 
 
Cut out magazine words that relate to the home theme.  Distress the edges with Mystery ink.
 
Arrange metal scraps, keys, buttons, dominoes, and magazine words to your liking.  Photograph for reference.  Glue on all paper pieces and words.  Doodle around words and stenciled areas with a ultra-fine sharpie pen and a white gel pen.  Brush over all house surfaces with Decou-page.  Allow to dry.  With foam brush, cover all wood block surfaces with Decoart ultra-matte varnish.  Dry well.  Glue down all metal pieces, dominoes, keys, buttons with E6000 glue.  Also glue in the chimneys with E6000 glue, referring to photo. 


I hope you enjoyed this project and look forward to seeing what you've created with Susan K. Weckesser products. 
 
Joyce Shaulis     For the Susan K. Weckesser Design Team
 
Susan K. Weckesser products:
Celebration of Simple red rubber stamps http://www.unitystampco.com/
Colorburst scrapbook paper
Color Box mini-pop inks: Kiss, Cocoa, Fresh, Sky, Mystery, Ice http://www.clearsnap.com/
 
Other Products:
Decou-page, Decoart paints in True Red, Peacock Teal, Sour Apple, Ultra-Matte varnish  http://decoart.com/


Friday, March 4, 2016

Trash to Treasure

Hello it's Samantha today with a pretty and practical recycling project :)
I just can't bear to throw  away old tins and jars so they usually get decorated and used as something completely different. Susan's house stamps are PERFECT for this!
 I measured my tin from top to bottom of the area I wanted to cover and then measured the diameter and cut a piece of white card to size. I then stamped the designs using silver embossing powder as I wanted something a little different to usual black outlines.
I coloured using my Derwent watercolour pencils and adhered to my tin. String wrapped tightly around keeps it in place whilst the glue is drying!
When I removed the string it I added some flowers and sequin stars a word stamp and it looks like this:
Here it is being used on my desk. The tin next to it has also been decorated now too!!
Much better than throwing them in the trash!! It would make a great plant pot too!
The stamps I used are:
Tumbleweed Houses and they can be found {right here}
and Journal Doodles with a Heart and they can be found {right here}

 I do hope you like my tin and I've inspired you just a little.
Wishing you a lovely day.
Susan K. Weckesser Design Team member

Friday, March 14, 2014

Time Capsule

I recently lost my grandmother, so I decided to create an art piece in her honor. I created a time capsule with an old photo of my grandmother with her two twin daughters my mom and my aunt.


I created it from a making tape roll that reminded me of a clock's shape. I covered it with SKW patterned papers on the inside and out and also created the backing of the capsule.
I stamped the little SKW house stamp on white cardstock with archival brown ink. Then I covered the roof with clock's parts to compliment the time capsule theme. I colored the rest of the house with colored pencils. I cut it out and attached it to the capsule with a folded piece of cardstock.


I added felt green trees and my grandmother's photo which I cut.


I created grass by using double sided tape and green flower soft. Then I added embellishments like the picket fence which was sprayed with a copper spray, chipboard bicycle and chipboard birds on the top. I finished the capsule with colorful flowers.

This was fun and sad to create but I'm really happy with the result.

Have fun creating!
Einat

Friday, December 20, 2013

Quick and Sweet Last Minute Gift

Good Morning Creative Peeps!

Today I want to share with you a quick last minute gift that you can do in under 30 minutes.

I have been saving this maple syrup bottle for months (much to the annoyance of my hubby!) because I knew I wanted to use it for something. I LOVE the lines of it and that cute little handle. :) 


With the holidays coming up, I am making 60+ little jars of my homemade salted caramel sauce for my hubby to give to his office peeps. So...I decided my little bottle needed to become a special jar of caramel sauce for somebody. 


I was lucky enough to have a total creative perfection moment...I was trying to figure out how to make the perfect circle for my bottle when I realized the center of my large Spellbinders gear by Donna Salazar was the exact same size as my bottle label AND was the perfect size for the "Good as Gold" tag from Susan's "Live in Color Tags" paper. WINNING!


After adding my label, I rolled a few flowers from Susan's Whimsical Paper line and hand cut a few leaves. I attached them to the corner with a hot glue gun. 


For my tag, I used a Spellbinders label die and Susan's paper, topped off with Susan's "Smile" Stamp from her "A little bit of Washi" stamp set from Unity. (I used Pickled Raspberry Distress Ink from Ranger.) I hung it from Canvas Corp black rope and added a little bow. 

Top it all off with a little "Golden Goddess" Glam from Tattered Angels to add some sparkle and your handmade gift is ready for whatever you want to fill it with!


Funny Note: For this pic, I filled it with a little colored water because I couldn't find my funnel to add my thick caramel sauce into the bottle! LOL. 

Want my recipe for my salted caramel sauce? Here is the base recipe I found at The Recipe Girl Blog: Salted Caramel Sauce. It is good this way, but I like to tweek all recipes...I let my sauce boil an extra few minutes because the color and flavor gets darker and it gets thicker as it sets. Plus, I like a little more salt than this recipe calls for. 

I hope you enjoyed my quick and easy project today! And trust me...make some homemade caramel sauce this Christmas...you will never go back to store bought!

XOXO,
KERI


Wednesday, January 30, 2013

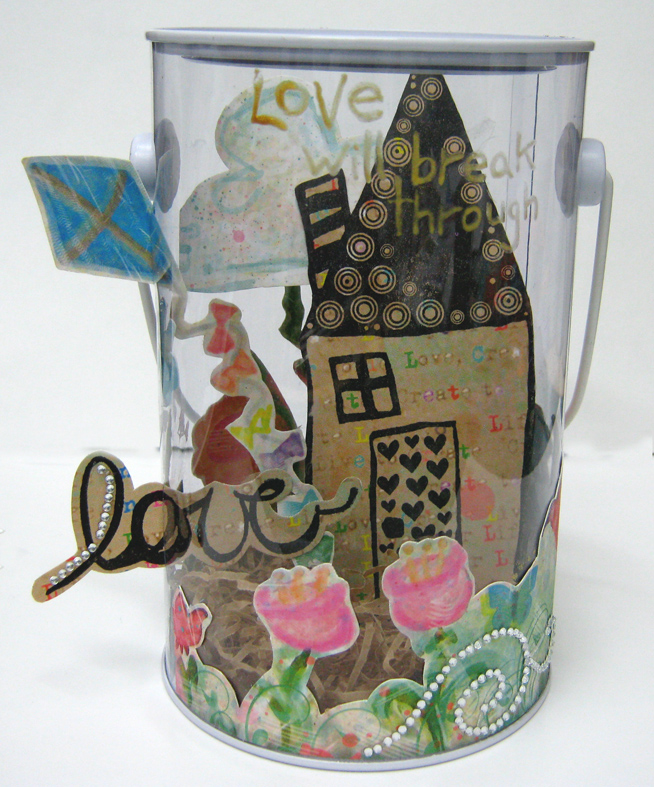
Love will break through!

Hi Susan Weckesser fans, Einat Kessler here with a fun project!
Have you ever felt like you're in a "box", creatively, physically or mentally? It happens to all of us. But there is one thing, one thing that always helps. One thing that helps, one thing that will always break through...LOVE!
LOVE WILL ALWAYS BREAKS THROUGH!


I created this project for a rainy day. A fun, cheerful and uplifting message to put on my desk as a reminder of the amazing power of love!


I took an empty plastic container and created a little scene inside. I stamped my favorite house stamp, cut it and adhered it to the bottom. I added a cloud and flowers. Then I cut a little slit on the side of the container and inserted a piece of cardstock with LOVE stamped on it. I also inserted a kite through another slit. I added a title and a little bling.


Try creating an inspiring project for yourselves, a project that would lift up your spirits and put a smile on my face!

Have fun creating!
Einat

Wednesday, June 13, 2012

For the LOVE of Ribbon!!!

20100915_9
I am sure that you have noticed by now that I LOVE ribbon! There is something about it that makes me {SMILE} I love using it with my scrapbooking, my cards, my altered crafts, my mixed media, or really just about any thing around the home or my studio or my garden!bird house 2
bird house 4 (2)
Because of the colors and the versatile nature of ribbon it makes it an easy medium to work with. You will find me even decorating BIRD HOUSES  with it! Prima Pin
Core'indinations 10
Ribbon can also be sealed on and decoupaged to create unique effects like the effect I created with my vintage brooch that you can see above. So easy and so much fun!
It is also fun to add a bit of ribbon to a card or a scrapbook layout for a splash or color or a bit of whimsy!
Core'Dination 26
Children & teens can also make up quick bows and fashion accessories. I LOVE to do this too!!! My girlies and I love to make up wristlets out of ribbon all the time! wristlet
Recycled crafts can look really AWESOME with a little bit of ribbon on them. Take a look at this recycled rice bag that I painted up and adorned with some ribbon. I will be teaching this online class really soon at CraftArtEdu.I also used Shimmerz paints and Kuretake on this project.
upcrafted rice bag
[QUICK PROJECT]:
Those canvas flowers are so cute and here is a quick way that you can decorate them with ribbon.

                   1.20120613_1
You need 1 ft. of ribbon, 1ft. of a different & slightly larger ribbon, a canvas flower, 1 button , good glue like Helmar 450 Quick Dry adhesive.
                      2.20120613_6
   Put a dab of glue on the back of the button and wait for a moment. Then start to stick the ribbon on the button in a circular, accordion motion. If you are using lace, you shouldn't need anymore glue.
                    3.20120613_7
Put a dab of glue in the center of the canvas flower and  adhere the button with ribbon on. Hold for a second.
                    4.20120613_9
  Flip the canvas flower over and glue a slightly larger piece of ribbon on.
        5.20120613_11
Enjoy your new ribbon adorned canvas flower! You can use it on crafts, wearable art, sewing, mixed media…..anything!
There are many places where you can find some wonderful selections of ribbon, like May Arts. So find some ribbon today….and put a {SMILE} on your face!!!!!
Have a wonderfully creative day!!!!
hugs,
~Susan

Wednesday, September 29, 2010

Using Old Scrapbook Supplies

If you are anything like me, you have a lot of scrapbooking supplies that are a few years old hanging around your house. 
Sometimes it can be really hard to part with it and you really don't have to. A lot of the papers, products, and colors from a couple of years a go are neutral enough to mix in with today's styles and pictures. If you really don't want to keep some supplies there are always groups such as church groups, women's organization, or children's groups that can use use extra crafting supplies and will likely gladly take your extra! Try to recycle you old supplies and mix them in with your new products. It is interesting to see how many old things like punches, are actually becoming popular again.  

                                          Keep on Scrappin'
                                                               Susie                         
                                                                                          

Friday, April 23, 2010

Recycled Dryer Flowers

A little bling from Prima Marketing Inc. adds some whimsical magic!

This dryer sheet was left white.
So if you are like me, you always have a lot of old dryer sheets hanging around. I can't throw them out because that just seems to be such a waste. I started to think of things that I could do with them. It turns out that they make really awesome little flowers for scrapbooks pages or paper crafts. Who knew!?!
To see how to make them go to SUSIEBEE STUDIOS . With recycling these dryer sheets it saved me money with supplies and it help the Earth out a little bit too! COOL!

                                         Keep on Scrappin'
                                                            Susie

ShareThis2

BrendaPInnickColorCafe