Showing posts with label canvas. Show all posts

Saturday, July 16, 2016

Home Sweet Home Canvas


Hello everyone! Katy here making my debut on this fabulous Design Team! My first project is a small canvas which would make a great new home gift. I used a mix of paper piecing and stamped images onto a background created with inkpads. I really like the whimsical feel of this piece with it's naive style.

Susan K. Weckesser Inc. products used:
I've created a quick process video showing you how I used the Color Pop Inks to make a background on my canvas.


My little houses are paper pieced from Susan's gorgeous patterned papers. The doors and windows use stamps from the Grunge Fun set and I used the same set to add texture to the houses and roofs. Each is finished with a tiny stamped heart.

The clouds are stamped onto white card with Ice ink, patterned with the Grunge Fun spotty stamp and cut out. Similarly, the sun is stamped in Kiss ink onto an area of one of the patterned papers.


I finished with some letter stickers and little brad doorknobs to embellish. The sides are decorated using just part of the kite stamp from Fly Away to create a repeat pattern.


I hope you like my very first project! It was a lot of fun to make.

Best wishes,
Katy x

Created by Katy Leitch
For the Susan K. Weckesser Creative Team

Fly Away stamp set


Grunge Fun stamp set

Monday, July 4, 2016

A SWEET Home Decore Idea Using Sharpie Markers...

Happy Daaaay Everyone!  Lynne here today sharing my first project for the new Susan K. Weckesser Creative Team.  I am so honoured to be a member of the 2016-17 team and super excited to share my latest creation, which is something a little bit outside of my usual offerings.
This July we are celebrating our Homes so I decided to alter this canvas wall hanging I have been saving (hoarding?) for several years with the intention of hanging it in a corner of my new studio space where I like to sit and use my paints, draw and color. 
Now just so you know, I don't usually "DO" home decor items. Don't get me wrong, I LOVE to decorate my home but with stuff other people have made, because my feeble attempts at making my own usually fail Big Time (grin).

But because this project was so simple and required no special skills or power tools, just some  ink, some stamps, my Sharpie markers and Ranger Stickles and Liquid Pearls... I think it turned out Beauuuutifully... Smile.
I used several of the Susan K. Weckesser Unity Stamp sets to create this super sweet, colorful and happy hanging,  (all listed below) and I have created a photo tutorial HERE on my blog if you are interested in seeing the entire process in more detail.  I do hope you like what I created for my first project for this new term and that it inspires you to create something of your own to honour your "Home Sweet Home".

For the Susan K. Weckesser Creative Team

Susan K. Weckesser Stamp Sets used for this project:
At Ground Level

Fly Away

the Happy Homestead

What's Up Gnomey?

Other items used for this project:
Sharpie Markers
Ranger Stickles & Liquid Pearls
Ranger Archival Ink


Monday, March 28, 2016

A Mixed-Media Canvas And a Tribute to Ms. Susan K. Weckesser

A bit of a bitter-sweet moment here for me as today I post my last project for the Susan K. Weckesser design team 2015-2016 term. But before I reveal my last project I just want to share that Susan was one of the first people to recognize my artistic bits back in 2012 and that being selected for a guest designer spot on her very first design team gave me the boost my confidence needed to keep trying to find my artistic voice.  I went from a two-month guest designer spot in 2012 to a full-time spot on her design team in 2013-2014 for two full terms, but I just couldn't stay away and I was back again for another stint for this past term. 

My time spent on Susan's design teams has been wonderful.  The designers in this group are supportive, inspirational and oh so very talented, plus I just LOVE everything Susan K. Weckesser!  From the first time I saw one of her stamp sets by Unity Stamps called "Create Your Day" her products have inspired  me, and like any good relationship, they bring out the best in me creatively (or so I think!)... Here are a few of my favorite projects inspired by Susan K. Weckesser products:
Mixed Media Canvas (one of my first)
A Favorite Layout of Mine "What's Your Definition of True Love?"
An Altered Book Bag
A "Simple" Card Recipe


I am also fortunate to live not too far from Susan and I have had the absolute pleasure of meeting her, spending time talking with her and being a student in several of her classes.  I actually give her all the credit for my doodling expertise, something I discovered after taking her class called "Do the Doodle" in 2010; (Go HERE to see the layout I created using this technique that was published in Canadian Scrapbooker Fall, 2013.)

So you can see that this post, my last for the design team but NOT my last using Susan's products, is a truly bitter/sweet moment... But I am truly excited to share THIS, my latest 8"x10' mixed media canvas I created featuring Susan K. Weckesser/Unity Stamps sets "Little Haven"  and "Painted Sentiments" , I hope you like it half as much as I did creating!  

Please Note:  for those of you that are interested, I have created a photo-heavy post showing my mixed media process in the creation of this canvas over on My Blog and I would Love if you popped on over to have a look! 

Yours Sincerely and Appreciatively,
For the Susank K. Weckesser Design Team


Friday, March 18, 2016

Charter Your Own Course

 Hello! Samantha here today and it is sadly my last post here as a member of Susan's design team. 
I've had a great time. Thank You Susan for the opportunity.
You may have noticed that March has been a month of mixed media pieces. My last make was a tin and for this make I've painted and decorated a canvas. The canvas is a deep edged/box canvas and the front is 4 inch x 4 inch. I used the Sail Away stamp set which has become a firm favourite of mine!
After painting the canvas blue I stamped the boat and waves 3 times on white card and coloured using Derwent watercolour pencils. I then cut out the images and glued in place.
I added white dots and some glitter for glistening waves. (Glitter always seems so hard to photograph but I hope you get the idea!).
The sentiment was stamped on white card using an alphabet set I had lying around. 
As I mentioned earlier it is a deep edged canvas. This gives the opportunity to take your design around the sides and on top. This is why 3 sets of waves were needed. (The 'compass' stamp is by Stampotique Originals and I had wrote the N E S and W).
The Sail Away stamp shown below set can be found at Unity Stamp Co by clicking right {here}
I love the message of this. Charter your own course. Life is what you make it!
I sincerely hope that you have enjoyed having me on this lovely blog and that I may have inspired you. If only a little.
Wishing you a lovely day
Susan K.Weckesser Design Team Member


Monday, June 23, 2014

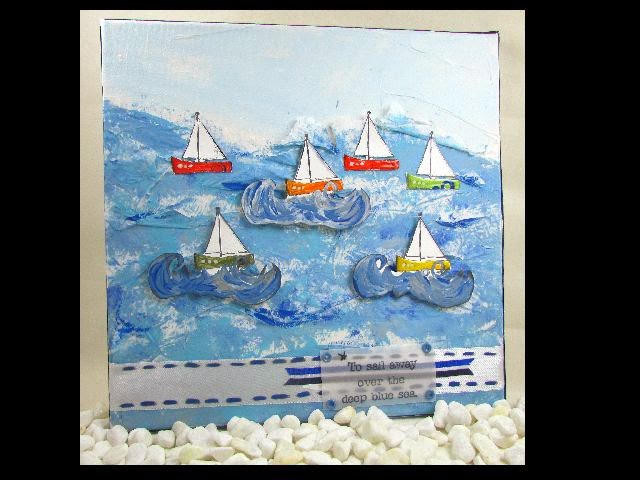
Come Sail Away

Welcome to my first post with the Susan K Weckesser Design team.
Let me share a canvas I made.
I must say I had so much fun creating with this adorable  Sail Away  stamp set created by Susan K Weckesser from Unity.
Let me share a few steps I did to create.
 This is one of my heavy paper pads that I stamped several copies of the Sail Away stamp.

The 12 x 12 canvas was easy to prepare. I put a layer of Mod Podge down and added torn sheets of tissue paper to add layers.
 While the canvas was drying I was able to work on painting the Sail Away  images. I loved mixing and blending several colors and allowing them to dry.
 One important step is to make sure all the tissue paper is trimmed and pushed down on the edges.
 Look how easy it is to blend and make the sea background, I left some white tissue exposed.
Once all the  Sail Away images were dry I was able to fussy cut them. 

 I used Susan K Weckesser's stencil to accent my thick white ribbon, first with ink and then with paint. I stamped and embossed the sentiment from Sail Away on a piece of vellum. I attached the sentiment with some eyelets and layered it on top of a tri-blue piece of ribbon.

 Wanted to share a close up of all the images~I pop dotted all the larger images with the waves. I also decided to cut a few extra images and cut out just the sailboat. I also decided to add some clear lacquer to make the sailboats shine!
 Thanks for your visit, would love to hear what you think of my first canvas project .


Thursday, April 24, 2014

Farewell...Thanks for all the Memories

Hello Creative Lovelies. 

It's Keri here on The Sweet Life Blog...for the last time. {single tear} 

More on that later...on to my PROJECT!!

I couldn't finish my term with Susan without a sentimental farewell...


This little piece is a jumble of my favorite Susan K Weckesser Stamps from Unity Stamp Company along with a lot of mixed media fun.

Here's a breakdown of a few steps:


My background started with Susan's "Splatter It" stamp and Distress Ink in Pickled Raspberry on a small canvas. I then took some yellow and teal Tattered Angels Baseboard to add some color. 

(I forgot to take a picture of this part.) I then laid a piece of lace over the top and lightly spritzed through it with a dark black Tattered Angels Glimmer Mist and layered a few pieces of colored drywall tape on my canvas.


To add some texture and shimmer, I took the puchinello style stamp from Susan's "A Little Bit of Washi", stamped it with Tim Holtz Embossing Ink and Ultra Thick Embossing Enamel (UTEE) in gold. 


To make my silver dots, I just used my finger tip to stamp with embossing ink and used silver UTEE. My circles were made by dipping the bottom of my Tattered Angels Glaze bottle in some Tattered Angels baseboard that I had sprayed on my non-stick mat and stamping it on my canvas. 

To Make your textured heart, follow these 4 easy steps (this is one of my FAVE techniques!)


(1) I started by painting my chipboard heart white. (It had a pattern on it.)
(2) Next, I smooshed my heart into my embossing ink and added a layer of UTEE. Heat to melt. 
(3) Let it cool and repeat. I used silver the first time and bronze the second. (Depending on how detailed your stamp is, you might want to repeat a third time.)
(4) While your final layer of UTEE is still hot and liquidy, tap your stamp into an ink color of your choice, place your stamp on top of your piece and lightly press down. I used Susan's "In Circle Me" Stamp. Don't use too much pressure or your stamp will slide. Lift it off and voila! A yummy textured embellishment. 

Here is a close-up...you can see the two toned colors better: 


So there you go.

My final project for Susan.

She and I did the math and between being a guest designer and design team, she and I have been together for the last year and I have loved every minute of it.

Susan, Cheryl and the whole team are truly some of the most genuine and supportive people I have ever had the privilege of meeting in the industry.  

I will greatly miss typing these little blog posts to you all twice a month. I hope I have inspired your to create some thing new and maybe challenged you to step out of your comfort zones...even just a little bit. 

As I always say...and I will say one last time...Make your art a choice...not an after thought. 

XOXO,
KERI

Wednesday, March 19, 2014

Inspired by the Heart

I am sometimes asked where I get my ideas...what inspires me?  The answer is simple.  It depends.  Sometimes it's an event.  Sometimes it's a photograph.  Sometimes it's an image.  For this canvas, I was inspired by the little pink hearts that appear on one of the whimsical papers designed by Susan
 Weckesser.

The Live, Love, Create paper (see below) has this charming little house on it and the door is full of sweet little pink hearts!

It reminded me of an anonymous quote I had heard, "It takes hands to build a house but only hearts can build a home."  Our theme on the blog this month is mixed media so I chose to make a canvas.  I used Susan's Fly Away stamp set to create the sun and clouds you see below:
I detailed the house using another stamp set, Grandma's Needlepoint, by stamping little bits of stitching with black ink.

I stenciled, used rub ons, trimmed out washi tape, and even added a heart charm to my canvas.

I couldn't resist adding little puffy heart stickers from my stash - I love the dimension they add!

I layered paper over the canvas, washi tape over the paper, and chevron bling  on top of it all!

Final touch was a few strips of washi tape in the upper left corner!

Whatever inspires you, I hope you find the time to play and create today!  Thanks for stopping by!


Susie Bentz
Susan K. Weckesser Design Team Member


Products:

Other products:  Kaisercraft rub on, TCW stencil, inks, washi tape, Mod Podge, tissue paper, black pen, music paper, ribbon, heart stickers

ShareThis2

BrendaPInnickColorCafe