Showing posts with label Paint. Show all posts

Tuesday, August 16, 2016

My Garden in an Art Journal

Hello everyone today is my day to share with you an art journal page inspired from my garden. My garden is a rather large one with lots of space I will share a picture or two below with you.

The art journal I have decided to use is a 5 x 7 one which is an awesome size with the stamps I have elected to use which are the beautiful In my Garden set.

I have also used a selection of pink blue and green paint along with gesso the awesome Susan K Weckesseer Stamp Pads (these are just an awesome size)


So how have I created my page firstly I painted the page pink and blue, all very random and every where don't be afraid to use your fingers to smear the paint.


I then let that dry and added some gesso


I then smeared some green paint on the page but forgot to take a picture

So then I took a black stamp pad and the stamps and just randomly stamped all over the page with flowers which I feel is how my garden is lots of randomness.


I then took the awesome Susan K Weckesseer Stamp Pads  and a water colour brush and coloured some of the flowers all very randomly.


this is my finished page


Now to share a picture of my inspiration with you, this was from spring last year.
  

I hope you have enjoyed my blog post and I will be back later in the month to share another page inspired by my garden 


Monday, July 18, 2016

"It Takes A Village" Mixed media wood blocks


Hi!  This is Joyce and I am excited to be part of the Susan K. Weckesser Design Team.  Mixed media and recycling is a passion of mine, so today I would like to share with you how to create your own village using the wonderful new mini-pop inks, stamps, and scrapbook paper that Susan has created. 

For this project, I used recycled children's wood building blocks.  I made mine reversible, and the roofs can be switched around also.  Another idea would be to make a holiday house on one side and "everyday" on the other.  You can use any size, shape, or combination of blocks, so get creative and have fun!


First, choose your blocks to make a little village.  Slice larger blocks in half on the bandsaw to make roofs.  


Next, tear up strips of old tissue patterns into sections approximately 1" x 3".  Using a foam brush and Decou-page, glue on tissue pieces to cover all sides of your houses and roofs.  Be sure to overlap edges a bit.  Let dry.
 
 
Take your mini-pop ink color and swipe it on all sides of your wood piece.  This covers quite easily and is bright and vibrant.  When dry, use Mystery for a vintage look by swiping the edges.  Continue with all colors until all blocks are colored.


Ink up the Celebration of Simple stamps with the mini-pop inks and stamp onto the Colorburst scrapbook paper for the roof fronts.  Cut out triangles to fit your blocks.  Adhere the pieces with the Decou-page.


Trace the house block shapes onto the Colorburst paper and cut to fit the blocks.  Use both sides of the paper for variety.  Glue the rectangle pieces with Decou-page onto the blocks. 
 
Drill holes 1/4" into roofs for chimneys (screws or springs) to fit.   


With the Doodle Stencil and a cosmetic sponge, pounce Decoart paint colors on house fronts and backs.  Use coordinating paint colors with the mini-pop ink colors.  Let dry.  Using the Mystery ink, go over edges of scrapbook paper. 
 
Cut out magazine words that relate to the home theme.  Distress the edges with Mystery ink.
 
Arrange metal scraps, keys, buttons, dominoes, and magazine words to your liking.  Photograph for reference.  Glue on all paper pieces and words.  Doodle around words and stenciled areas with a ultra-fine sharpie pen and a white gel pen.  Brush over all house surfaces with Decou-page.  Allow to dry.  With foam brush, cover all wood block surfaces with Decoart ultra-matte varnish.  Dry well.  Glue down all metal pieces, dominoes, keys, buttons with E6000 glue.  Also glue in the chimneys with E6000 glue, referring to photo. 


I hope you enjoyed this project and look forward to seeing what you've created with Susan K. Weckesser products. 
 
Joyce Shaulis     For the Susan K. Weckesser Design Team
 
Susan K. Weckesser products:
Celebration of Simple red rubber stamps http://www.unitystampco.com/
Colorburst scrapbook paper
Color Box mini-pop inks: Kiss, Cocoa, Fresh, Sky, Mystery, Ice http://www.clearsnap.com/
 
Other Products:
Decou-page, Decoart paints in True Red, Peacock Teal, Sour Apple, Ultra-Matte varnish  http://decoart.com/


Thursday, April 17, 2014

Eat, Drink, Breathe, Live in Color

 Hi! This is Valerie Reyes again, here to share a second project with you. This is another scrapbook title page.

I was inspired by one of Susan's patterned papers: Live in Color

I started by coloring in the phrase with Faber Castell Gelatos and a water brush. I fussy cut the phrase and started to build my page with layering and layout more like the style of my typical scrapbook pages than my first project for the My Sweet Earth blog. I used the b sides of Live, Love, Create and Color Burst on the page as well. I used gesso to tone down the pattern a bit to give myself a space to write, and made the ruffled pink paper using some crepe paper I had left over from a party.
I outlined the elements in black to give a little more definition to the title and the flower cut from the Live in Color paper.
I did make a bit of a mistake placing my words when I was writing.  Gesso to the rescue! A couple of layers and you can't even see the "in" above the word chaos.

Thanks for stopping by! I'd love to see what you're doing with Susan K. Weckesser's beautiful products.

Valerie Reyes
Susan K. Weckesser Guest Design Team Member

Wednesday, April 16, 2014

The EARTH with out ART is just EH!

Hello Creative Lovelies!

Keri here.

Earth Day here in the US is fast approaching on April 22nd and today I wanted to share with you a fun little project in the spirit of nature. 

Recently I was at my yearly creative retreat with my family and friends at a BEAUTIFUL Bed and Breakfast nestled in woods of Rogersville, MO. It was the perfect scenery to think about a project in honor of Earth Day. 


To make this project,  I stamped a little scene using Susan's "Create Your Day" Stamps from Unity Stamp Company on to a piece of kraft paper and painted it with acrylic paints (slightly watered down.) I stamped my house on Susan's Whimsical Paper to give it a little POP.  Then I had a summer camp flashback and made a stick frame, fresh from the grounds around the bed and breakfast. 


I love the quote I found online "Nature is the Art of God."

I hope you will take the time this week to find a little piece of Art in the world God has surrounded you with. 

Happy EARTH Day!

XOXO,
Keri 

Thursday, March 27, 2014

Flowerpot Mixed Media Layout

Hello friends!  Happy Thursday.  It's Lee-Anne here and today I am sharing a mixed media layout with Susan's stencils and papers. Since it is now Spring here in Canada, I can't help but think about gardening and all the flowers that are popping up such as tulips and daffodils.

My definition of mixed media is lots of layers using paints, inks, stencils, sprays, stamps, flowers, fibers, papers to create texture and dimension.  For my layout below, I used lots of different mediums such as paint, sprays, ink, modelling paste and glitter.


For this layout,  I created with Susan K. Weckesser's Live In Color Collection.  First I fussy cut some flowers and the title "Live In Full Color" as well as drew freehand and cut a flower pot.

 I then ran the flowerpot through my embossing machine with a weaved basket embossing folder to give it more texture and dimension then inked it with some distress ink.

Next I took some modelling paste and a brick stencil and added it the paper as shown. I felt that it  needed some color so I used a paint dabber in a beige color and dabbed the bricks.  When the brick background was completely dry,  I added some paint splats in red and yellow with my acrylic paint dabbers.

I adhered the stencilled paper to the kraft background and then added my flowers and flowerpot, which I gave more depth by adding some pop dots.  I thought the flowers needed something so I added some Liquid Glass and some yellow Stickles to the center of the red flower and when they were dry, I outlined with a fine black pen.  Finally I used Susan's stencil and added some "grass" with a green paint dabber and and around the top right and bottom left with a white paint dabber.

Here are some more closeups


I am going to put this in a 12X12 scrapbook frame and add it to my studio.  I hope I have inspired you to create.  Have a wonderful day!

Lee-Anne

Wednesday, March 12, 2014

Live To Create, Create To Live Art Mixed Media

Hello friends!  It's Lee-Anne here today and I would like to share a simple mixed media layout that I created with Susan K. Weckesser's beautiful Live In Color Collection.


 I love color and Susan's Live In Color Collection is so pretty and it makes me hope for Spring.  It's so easy to create mixed media art with because it already looks that way.

For this piece this is the process I used to create this layout:

I took a 12X12 piece of white card stock.
I used some Tim Holtz Distress Paints and painted the sky and grass.  Then I used some Ranger Paint Dabbers to paint the sun and clouds.
Next I fussy cut the house and title out of Susan's Live In Color Paper Collection.
I then took Susan's stencil and some modelling paste and went around the edge of the background and then I doodled and doodled with a black archival pen.
For the flowers I "painted" with some Heidi Swapp Color Shine Mists
and then I took a piece of Crack Tape/drywall tape and "stencilled" with some modelling paste in the clouds to give them more dimension and "fluffiness".
The mountains are nearby so  I thought I would make it realistic and I used Susan's stencil and modelling paste to create some "peaks".
Finally I adhered some sequins to give more texture and dimension and then my journaling which I cut from Susan's papers.

 Here are some more detailed photos.


I think I will frame this and hang it in my new studio because it definitely is my motto.  I hope you enjoyed your visit. Thanks for stopping by.

Lee-Anne

Supplies:

Acrylic Paint Dabbers - Ranger
Cardstock - American Crafts
Chipboard Letters - American Crafts
Distress Paints - Tim Holtz
Modeling Paste - Golden
Patterned Papers - Susan K. Weckesser
Pen - Marvy Uchida
Sequins - Teresa Collins
Stencil - Susan K. Weckesser


Friday, January 24, 2014

"Home is where the heart is" canvas

Hello dear friends, Einat Kessler here with a mixed media canvas. Directly from the CHA show I wanted to share with you the project from the amazing workshop Susan and I taught at the show.


Start with a 6"X6" canvas and paint it with teal, yellow and green acrylic paints. water your brush and blend the colors to create a more uniform background. Then add patterns using the ever so fun Susan's stencil using distress ink and a blending tool.


Stamp the house stamp on white cardstock and then color it with Pan Pastels. I like to use a baby wipe as my brush. it has a really nice wash effect and you have more control of the areas you color.


Color some white paper flowers in the same technique. Stamp the canvas with some washi tape stamps from the "A little bit washi" stamp set and a sun from the "Fly away" stamp set. Use permanent ink so it will stay on the canvas and not smear.


Cut some flowers and butterflies from the Beautiful Daydreams patterned paper and write the title on a white cardstock. Assemble your canvas, adding the house and all the embellishments. Add little swirls using the number 9 on the stencil in different directions. To finish the canvas add some distress ink and Pan Pastel to all the edges of the canvas.

Have fun creating!
Einat

Thursday, January 23, 2014

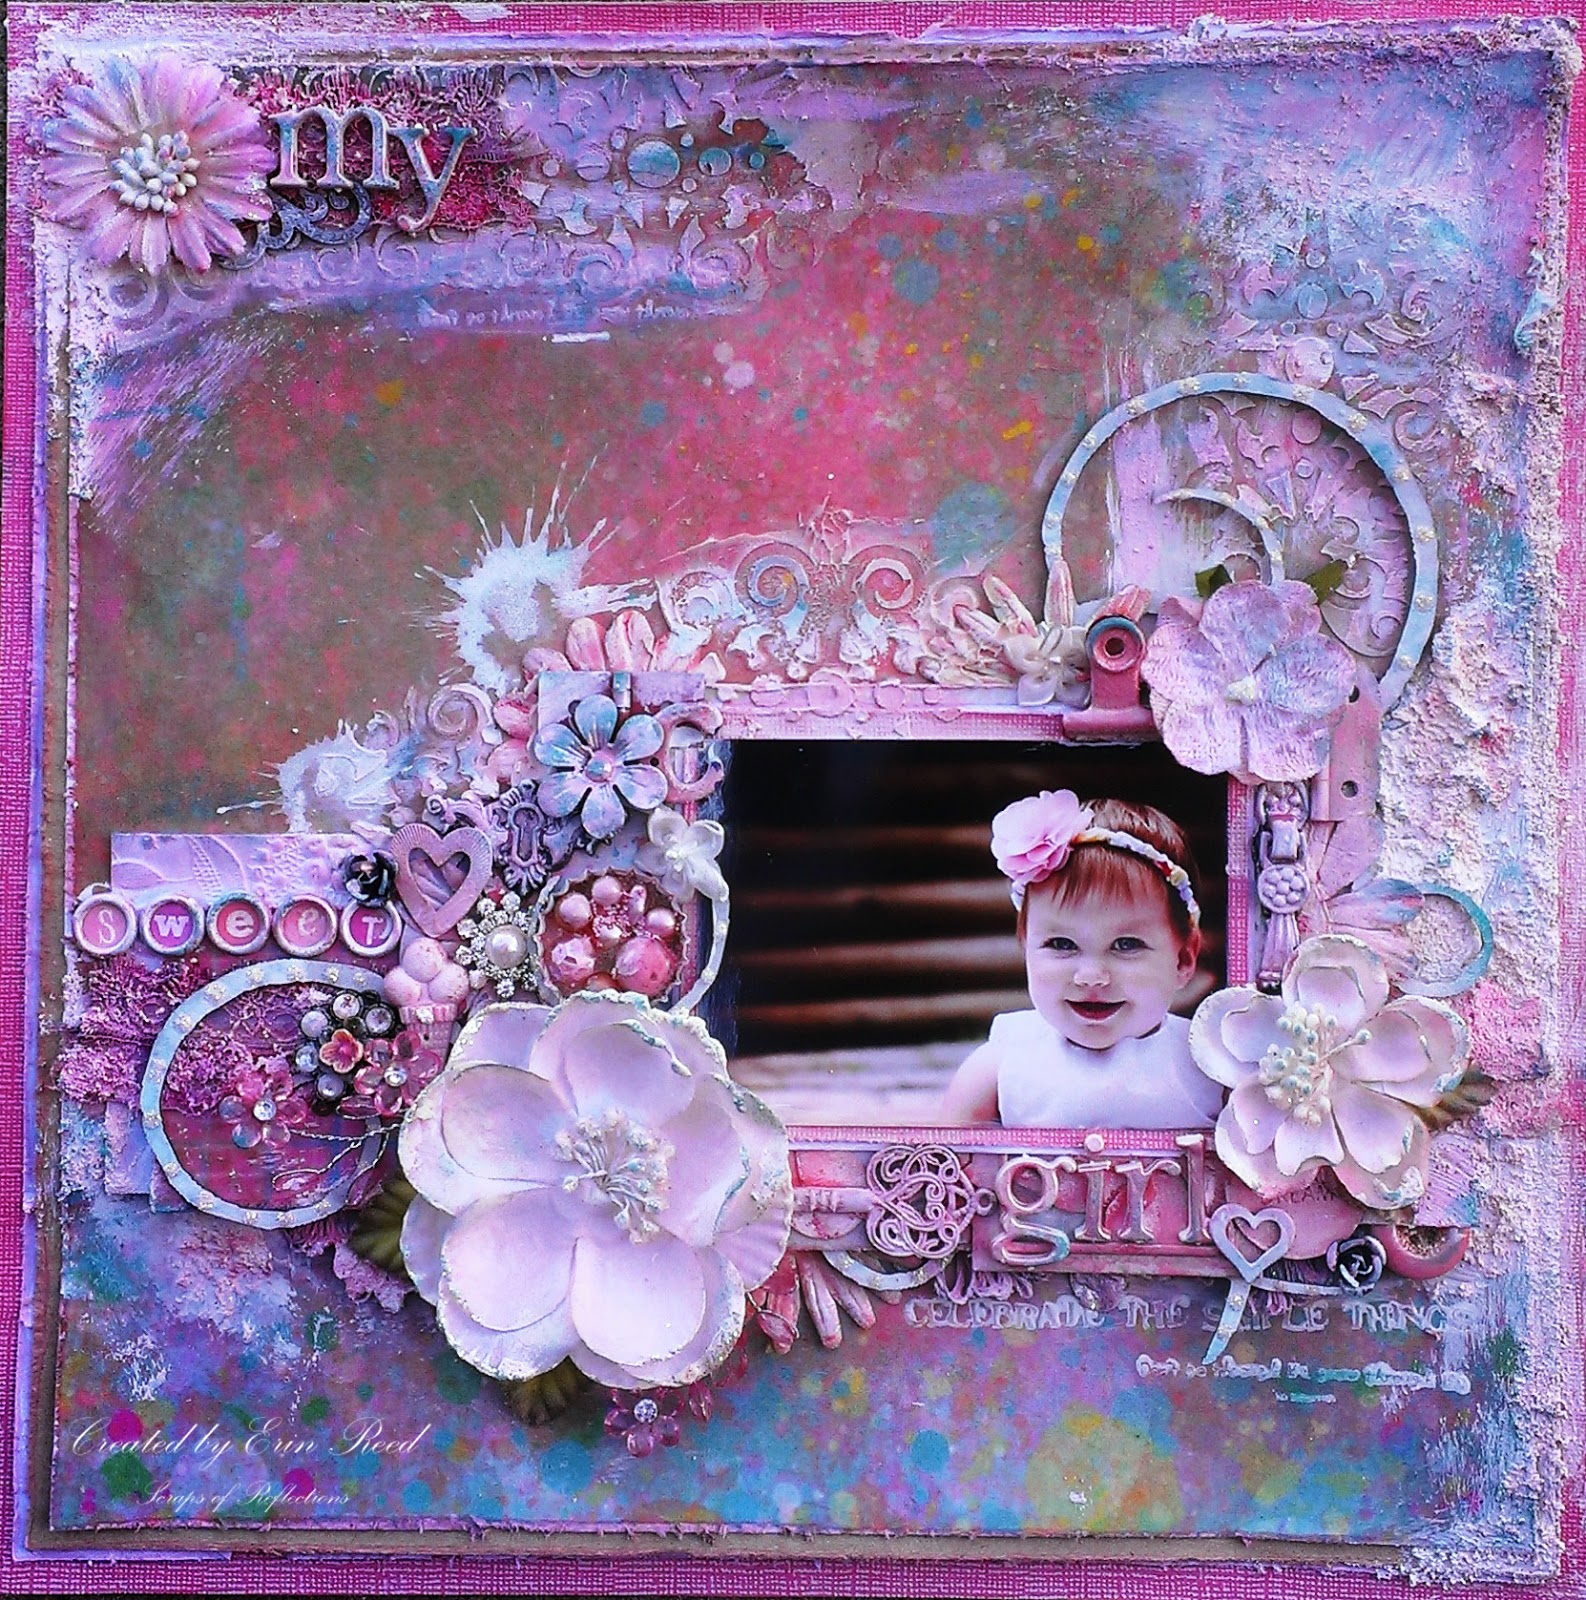
my sweet girl

 For Catherine's first birthday we had a few pictures taken by a friend, and they turned out wonderfully.  This is one of the beauties that came out of that shoot.
 

I love the look of mixed media, playing with your embellishments, creating texture, looking around the page at all the fun different items, but never taking away from the picture itself.  That is part of the art, not letting the page "eat" the picture, but letting the page enhance the picture.  

Below is my methodology of how I build a page - a peak into my head so to speak.  Sorry for the lighting on some of the pictures, I did not always have the best light available as I was building my page.
How to Build a Mixed Media Page

 1) I start with the papers.  I look for papers that correspond to my picture, I want to complement it, not fight with it.  I used my daughter's hair bow (since the rest of the picture is brown, flesh, or white I used those colors (pink, teal, white, etc).  The papers from Susan K. Weckesser were a perfect match, they just begged to go with this picture.

http://www.susankweckesser.com/welcomehttp://www.susankweckesser.com/welcome
 The "color burst" paper was perfect for the background, and then I added in the "bouquet" and "beautiful days" as layers.

2) I this point I have a sketch in my head of the design of the layout, I know I wanted the picture in the middle right, with elements going above and to the left of the picture.  I start pulling items that I think will work on my page, not caring about color, just the shapes.  Not all the items will make the cut and be used, but this gives my an idea if I like where I am headed.  Nothing is glued down, it is just my rough idea at this point.


3) I apply gesso to all the embellishments that need a change of color (except for the top lace it was white so it took color no problem).  The spray them with spray mist.  I used Tattered Angels mist in a couple of different shades of light pink. I mist them each 2-3 times to give them a good coat.  I also let them dry before each coat so they absorb the mist better.  I do this off the page so I do not apply to much mist to the background papers.


4) Now I add texture to the page.  I used stencils by Prima with gesso, added in my papers (distressing each layer of paper with scissors and edging them with ink) and trims, and for fun I added in layers of Snowtex.  I gives this wonderful bumpy texture.  I even took a couple of Susan K. Weckesser stamps and stamped in gesso below the picture and in the top left corner below the lace and stencil area.  I used two small phrases found on the stamps sets below "Celebrate the simple things" and "Don't go through life, grow through life"

http://www.susankweckesser.com/welcomehttp://www.susankweckesser.com/welcome


5) Now I start to add my embellishments back on.  I do not have the picture glued down yet, as I might still spray and I don't want to damage my picture.


6) I start to glue down items as I like to way the looks in that location.  I sometimes take pictures and step away for the page to see how it looks a hour later (especially if I am waiting for something to dry).


7) If I feel there are dead or blank areas, I will either add in another embellishment (or two) or add in more texture.  I did this just above the picture, it felt it was missing something so I added another bit of stenciled gesso.  I also sometimes move things around or change the item completely.  I just let the page go with the flow.  I don't fight to make it work, because I find it never looks good if I do that.


 8) One of the last steps is to go over the gessoed embellishments one more time with paint or chalk ink, sometimes both.  This help them pop out of the page a bit.  I might even add a bit more gesso to the items so they don't look to pink. it adds contrast.  I also leave some items plain, or without gesso like bling and such.  On this page I also added on some glitter via Stickles from Ranger in Crystal for a bit of sparkle.


 9) You can see some of the texture and the Susan K. Weckesser Stamp


Supplies Used:
Cardstock - Core'dinations
Patterned Paper - Susan K. Weckesser 
Flowers - Prima and Petaloo
Media - DecoArt, O'Leary paint, Liquitex,
Paint, Mist, Sprays, glitter - Ranger, Tattered Angels, Martha Stewart
Metals - Prima, Momenta,  and Other
Chipboard - Memory Maze
Stamps - Susan K. Weckesser
Mask - Prima
Trims and Lace - Other
Found Objects - Other

 Enjoy!!
http://scraps-of-reflections.blogspot.com/
 Erin Reed Design Team Member

ShareThis2

BrendaPInnickColorCafe