Showing posts with label stamping. Show all posts

Monday, December 26, 2016

Going Wild with Stamped Pendants

One of my favorite things to do is to use supplies and materials in unexpected ways.  So I love to use stampers and stamp pads in jewelry making, jewelry components in paper crafting, and incorporating things like fabric, yarns, and thread into all things.

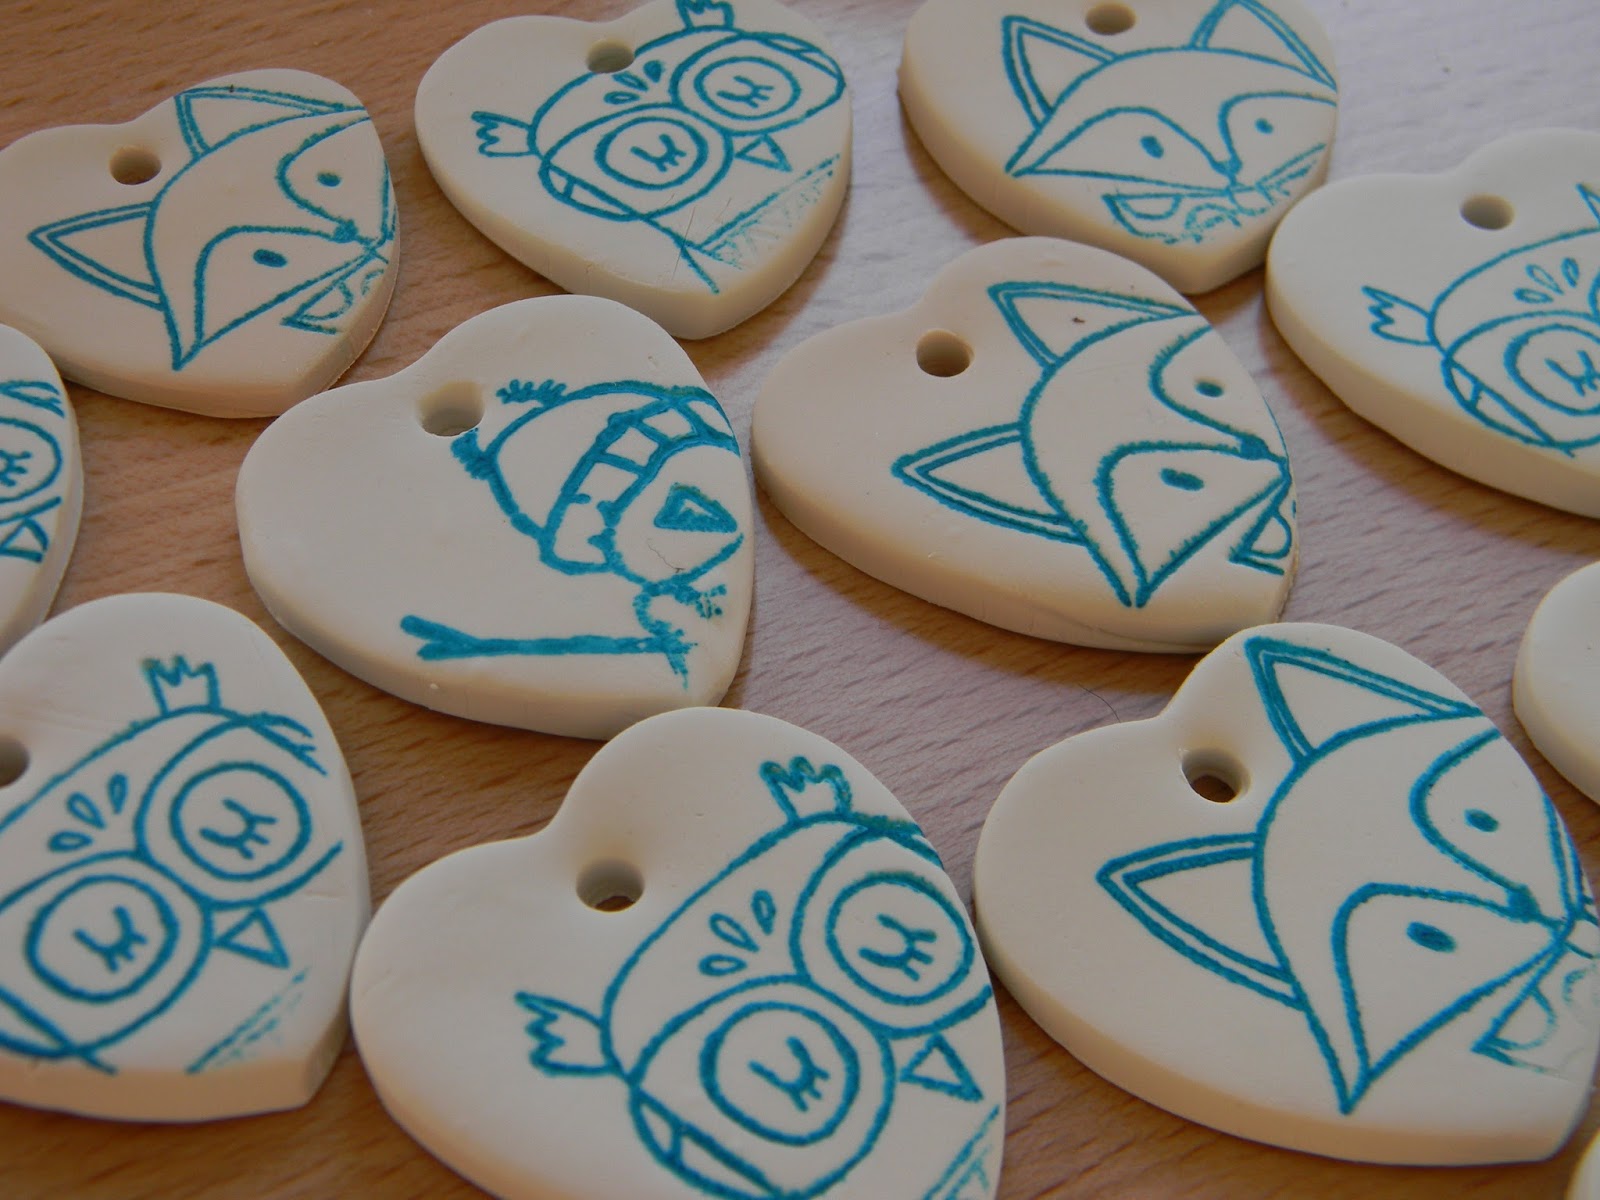
I use stampers all the time on clay.  It is super easy to do and the little components can be used in many ways.  Recently I made piles of personalized Christmas ornaments with some of Susan's stamps and some Sculpey clay.  To finish some of the clay scraps off, I stamped a few extras.


I used a straw to poke holes in the clay before baking.


They can easily become simple pendants on a ribbon necklace.


These will make lovely little gifts for friends.


Added to some colored twine, they dress up a simple jar of candy.


I used:
Sculpey polymer clay
Stamp pad
Colored Twine
straw
plastic rolling pin
Plexiglas clipboard
Small Heart cookie cutter


Have a very Happy New Year!

Brooke Bock from the Susan K. Weckesser Design Team

Tuesday, December 20, 2016

Life's A Picnic

Hello Friends!!  This is Joyce Shaulis with my last post with the 2016 Susan K. Weckesser creative design team.  This month, we're making gifts that we can give away to strangers, neighbors, or friends.  I had these miniature picnic baskets on hand just waiting for creativity to strike!  I thought these would be adorable to fill with candy and given away as little gifts. 


For this crafty project, I used Susan's co-branded stamp set, "Going Wild".  To begin, I used the clearsnap mini POP ink in Mystery to stamp the fox and the owl on white cardstock. 


Next, I used the mini POP ink in Kiss and Fresh on the basket lids.  I just swiped the ink pad right onto the wood lid.  I also used a damp paintbrush to fill in small areas where I couldn't get into with the ink pad. 
I colored in the images with markers and cut them out.


I used Decoart acrylic paints in red, yellow, light and dark green to paint plaid and polka dots on the  lids, on top of the red and green ink. 
After experimenting a bit, I decided to add a border around the images so they would stand out better.  I glued the images on top of cream colored cardstock and cut around them.   I lettered out the words "Be Merry" and "You are loved" with an ultra fine sharpie marker onto white cardstock and cut them out in rectangular shapes. 


With an old paintbrush, I brushed Decou-page on the back of the cut out images and adhered them to the lids.  When they were dry, I brushed more Decou-page on top of the images.  After completely drying, I outlined all images with a charcoal pencil and gently smudged them with a Q-tip. 
I added dashes, a squiggly line and dots around the lid border with paint and a small paintbrush.  Then I coated the surfaces with the Decou-page.  When dry, I sprayed them with Decoart's acrylic matte sealer. 


I hope you enjoyed my final 2016 project, as I have enjoyed sharing ideas with you these past months.  I hope you have a beautiful Holiday Season with loved ones and family. 
 
 
Joyce Shaulis                     Susan K. Weckesser Creative Design Team Member
 
 
Susan K. Weckesser products used:
https://www.clearsnap.com/ mini POP inks in: Mystery, Kiss, Fresh
 
Other products used:
https:decoart.com/ acrylic paints in red, yellow, light green, dark green. Decou-page, Acrylic matte sealer
miniature picnic baskets from Michaels
charcoal pencil
 ultra-fine Sharpie marker
Q-tip 


Wednesday, November 30, 2016

Paint Chip Gift Tags

I love tags.  I love making them, looking at them, collecting them, hanging them everywhere...  To me they are little bits of art.

Half the fun is finding a base.  I love shipping tags but I also love using something different.  Today I wanted a quick and inexpensive way to make tags. So naturally I grabbed some paint chips from my favorite home improvement store....  I picked the shapes and colors I wanted.


Basic supplies needed are paint chips, Susan K. Weckesser Color Pop stamp pads, stamp sets, acrylic block, scissors, twine, a paper punch and embellishments.

I love the ombre look of paint chips.

For these tags I used the Painted Sentiments stamp set.


I was particularly fond of the shape of these chips.  They seemed perfect for the One Of A Kind Winter {Christmas Campaign} stamp set.


And they seemed perfect for a whole little street of houses using the HeartFULL Homes stamp set.


Also from the HeartFULL Homes stamp set is this sweet set of flowers....


Perfect for the season is the Very, Very Merry stamp set.


And then I played with these paint chips too...


I kept my embellishments simple: sticky back crystals, pearls, and some twine to tie them on....


You could fancy them up with whatever goodies make your heart sing.


I wanted to focus on the simplicity of the stamps and paint chips.


Any of the stamps that did not get a great impression, I just did not use for this project.


This may become my new go to for gift tags...


It was such a fast and easy project.


I think the snowmen are my favorites...


These would be perfect for an art abandonment...


I hope I inspired you to do some quick creating today.

Brooke Bock, Susan K. Weckesser Design Team

Thursday, October 6, 2016

Hello!  Brooke here with you today. On my workbench in my shed/studio this week I have had my 2 boxes of scraps out.  I sift through them in search of some bits to pull together to make some cards. I realized it is not too early to start to make some winter greetings.   It will not be long before we see some snowflakes flying.


Let's gather some supplies to make this cute card:
Washi Tape
Sticky Rhinestones
Card stock Scraps
Scissors
Glue Stick
Acrylic Block
Let's get started...
Fold your card.
Stamp your image.
Trim your image.
Adhere to card.
Adhere 3 rhinestones next to image.

Stamp sentiment.
Trim card stock to frame sentiment.
Adhere to card.

Add a little washi tape across 2 corners.

 It's never to early to start on some winter greetings!
Brooke Bock from the Susan K. Weckesser Design Team.

Tuesday, August 30, 2016

Making A Journal Cover Using Susan K. Weckesser Stamps and Sculpey Clay

Hi Folks!  Brooke Bock here with another way to transform a simple purchased journal into something special.  I have long been fascinated by journals that have complex clay designs on the covers.  We are not doing that today.  We are doing something simple that you can even do with your kids to send with them to school.


Gather some Sculpey clay, a purchased journal, and your clay conditioning machine.


I used the Premo Accents with the flakes of large glitter but you can use any color you want.  A light color will show your stamps better.

Run it through the clay conditioning machine several times until the clay is soft and supple.  Fold it in half or fourths each time as you run it through.  As it gets more supple, start to plan how to run it through to have it almost the same size as your journal cover.  For example, you would not want to fold it so you have a very long narrow sheet.


Lay it on your journal cover and gently press it down.

Flip the book over onto a non-stick working surface and use a clay dedicated knife to trim the edges even with the cover.


Get your stamps and stamp pads ready.  I used the Whisper stamp pad, What's up Gnomey?, Going Wild, and Painted Sentiments stamp sets.


Then the fun begins.  Add your stamps.


Keep adding until you are pleased with your design...


For adding color, I used the Perfect Pearls from Ranger to gently paint color where I wanted it.

I flicked a little of the powder on with the paintbrush and wiped it when I was done.


Remove the cover.

Then bake it according to manufacturer's directions in a clay dedicated oven.

Then use a layer of E6000 to glue your cover on.  


How fun is that?

This is easy enough to do with the kids.

You could make personalized ones for everyone on your Christmas list.

Thanks for joining me today.

Brooke Bock, member of the 2016 Susan K. Weckesser Design team.


Monday, July 18, 2016

"It Takes A Village" Mixed media wood blocks


Hi!  This is Joyce and I am excited to be part of the Susan K. Weckesser Design Team.  Mixed media and recycling is a passion of mine, so today I would like to share with you how to create your own village using the wonderful new mini-pop inks, stamps, and scrapbook paper that Susan has created. 

For this project, I used recycled children's wood building blocks.  I made mine reversible, and the roofs can be switched around also.  Another idea would be to make a holiday house on one side and "everyday" on the other.  You can use any size, shape, or combination of blocks, so get creative and have fun!


First, choose your blocks to make a little village.  Slice larger blocks in half on the bandsaw to make roofs.  


Next, tear up strips of old tissue patterns into sections approximately 1" x 3".  Using a foam brush and Decou-page, glue on tissue pieces to cover all sides of your houses and roofs.  Be sure to overlap edges a bit.  Let dry.
 
 
Take your mini-pop ink color and swipe it on all sides of your wood piece.  This covers quite easily and is bright and vibrant.  When dry, use Mystery for a vintage look by swiping the edges.  Continue with all colors until all blocks are colored.


Ink up the Celebration of Simple stamps with the mini-pop inks and stamp onto the Colorburst scrapbook paper for the roof fronts.  Cut out triangles to fit your blocks.  Adhere the pieces with the Decou-page.


Trace the house block shapes onto the Colorburst paper and cut to fit the blocks.  Use both sides of the paper for variety.  Glue the rectangle pieces with Decou-page onto the blocks. 
 
Drill holes 1/4" into roofs for chimneys (screws or springs) to fit.   


With the Doodle Stencil and a cosmetic sponge, pounce Decoart paint colors on house fronts and backs.  Use coordinating paint colors with the mini-pop ink colors.  Let dry.  Using the Mystery ink, go over edges of scrapbook paper. 
 
Cut out magazine words that relate to the home theme.  Distress the edges with Mystery ink.
 
Arrange metal scraps, keys, buttons, dominoes, and magazine words to your liking.  Photograph for reference.  Glue on all paper pieces and words.  Doodle around words and stenciled areas with a ultra-fine sharpie pen and a white gel pen.  Brush over all house surfaces with Decou-page.  Allow to dry.  With foam brush, cover all wood block surfaces with Decoart ultra-matte varnish.  Dry well.  Glue down all metal pieces, dominoes, keys, buttons with E6000 glue.  Also glue in the chimneys with E6000 glue, referring to photo. 


I hope you enjoyed this project and look forward to seeing what you've created with Susan K. Weckesser products. 
 
Joyce Shaulis     For the Susan K. Weckesser Design Team
 
Susan K. Weckesser products:
Celebration of Simple red rubber stamps http://www.unitystampco.com/
Colorburst scrapbook paper
Color Box mini-pop inks: Kiss, Cocoa, Fresh, Sky, Mystery, Ice http://www.clearsnap.com/
 
Other Products:
Decou-page, Decoart paints in True Red, Peacock Teal, Sour Apple, Ultra-Matte varnish  http://decoart.com/


ShareThis2

BrendaPInnickColorCafe