Showing posts with label Fussy Cutting. Show all posts

Monday, July 14, 2014

2771 - Our Home Journal Pages

Hi everyone Steph Ackerman here today.   We've been asked this month to open our eyes, look around, see the world, and be inspired!  Some times you just need to be still to take it all in.

I have never really given much thought to journal pages.  I've seen a lot of then, but never had the desire to create any.  But, this month, I  figured I'd give it try.  I had so much fun creating these pages.  I can't believe how freeing it is!!  No rules.  No demands.  Just do what you want and see what happens!!


I spritzed the pages with  the new ColorBox Spritzers - Mermaid, Lemon Drop and Grasshopper - allowing the colors to flow into each other.  Next, I placed the Umwow Harlequin stencil in the corners of both pages and inked it with ColorBox Grasshopper Archival Ink.  I also used the Susan K Weckesser stencil along the bottom of the pages, inking with the same color.


Stamped and fussy cut Unity's Little Haven with ColorBox Wicked Black Archival Ink, then colored it with Smooch Accent Inks.  I used Susan K Weckesser stencil on the roof to create some dimension, and added my house numbers.  The sun from Unity's Fly Away stamp set was also colored with Smooch Accent Inks.
 

The flowers along the bottom edges are from Susan K Weckesser' stencil and inked with ColorBox Crafter's Ink by Ann Butler.

The phrases were cut from Susan K Weckesser Live in Color pattern papers.  The phrases are amazing and are very appropriate to these journal pages.  And the bench reminds me that sometimes you need to sit and enjoy the world around you.


So I think I am officially hooked!  I see more journal pages in my future.  What about you?  Do you create journal pages just because???

Thanks for stopping by today.


Steph Ackerman
DT Member for
Susan K. Weckesser

Thursday, July 10, 2014

One Day At A Time


 Do you like to keep track of your weekly appointments and small details? I love to carry a planner and document all the little things. This week I want to share a double page  I made using stamps and paper from Susan K Weckesser products.This reminds me of my daily week in my neighborhood, watching the birds and enjoying the sunshine.


Sing your Song


A Little Bit Washi  


Fly Away

Aren't these fun stamps? Let me share some steps along the way to finishing this double layout.


My blank pages- I always add a layer of Gesso to prep them.

 Distress
Our team at Susan K Weckesser were given some wonderful paper from Coredinations Color Core to use and one stack I received was one of my favorite.

  I distressed with a sanding block and then used ink around the edges.


I stamped and water colored the images quickly and didn't worry about the lines because I fussy cut them all.


Here are all the pieces added to my pages and some of the details close up.


Did you notice I used one other Susan K Weckesser stamp set? I love using the Stamped Sentiments in my journal pages and I also use the Susan K Weckesser paper with labels from Live In Color Tags to write notes during the week.


Monday, June 23, 2014

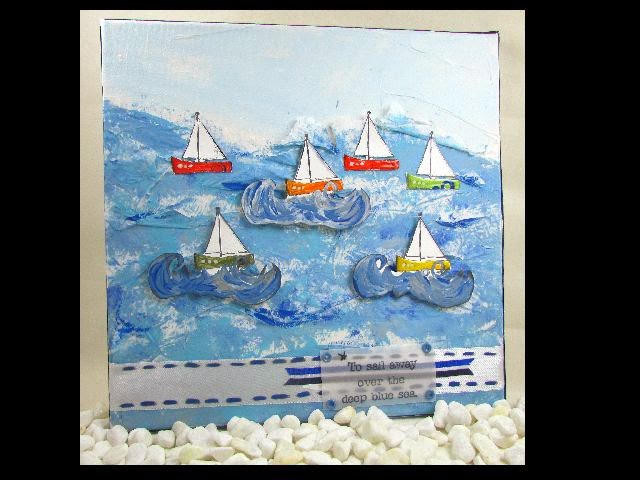
Come Sail Away

Welcome to my first post with the Susan K Weckesser Design team.
Let me share a canvas I made.
I must say I had so much fun creating with this adorable  Sail Away  stamp set created by Susan K Weckesser from Unity.
Let me share a few steps I did to create.
 This is one of my heavy paper pads that I stamped several copies of the Sail Away stamp.

The 12 x 12 canvas was easy to prepare. I put a layer of Mod Podge down and added torn sheets of tissue paper to add layers.
 While the canvas was drying I was able to work on painting the Sail Away  images. I loved mixing and blending several colors and allowing them to dry.
 One important step is to make sure all the tissue paper is trimmed and pushed down on the edges.
 Look how easy it is to blend and make the sea background, I left some white tissue exposed.
Once all the  Sail Away images were dry I was able to fussy cut them. 

 I used Susan K Weckesser's stencil to accent my thick white ribbon, first with ink and then with paint. I stamped and embossed the sentiment from Sail Away on a piece of vellum. I attached the sentiment with some eyelets and layered it on top of a tri-blue piece of ribbon.

 Wanted to share a close up of all the images~I pop dotted all the larger images with the waves. I also decided to cut a few extra images and cut out just the sailboat. I also decided to add some clear lacquer to make the sailboats shine!
 Thanks for your visit, would love to hear what you think of my first canvas project .


Monday, December 16, 2013

A quick card

I love red, white and Kraft at Christmas, it's so warm and cozy and makes pretty cards. 

Here's a quickie Christmas card made with the fern stamp from the Autumn Grunge stamp set with Unity.


I very simply drew a circle on my Kraft card stock.


Then stamped and embossed the fern all the way around.


I have to admit that I love fussy cutting things out and if you have the patience it's worth the fuss! Just layer it up with 3d foam pads and add a few sticky jems and a bit of ribbon from May Arts and it's done. 


Happy Christmas crafting.

Jaine with the Susan Weckesser Design Team.


Friday, November 29, 2013

Faith

Hi dear crafty friends! Einat Kessler here with a new project to inspire you.
This week we are celebrating Hanukkah, the holiday of light and faith. Many of my non Jewish friends have been asking me what exactly is this holiday? Well...it's a miraculous story of faith, courage and light.


The best way to tell this story is first to share with you a card I made that summarize everything you need to know. 8 burning candles and the word faith are Hanukkah in a nut shell. I created this card from bright patterned paper which I then colored with Pan Pastels in fiery colors: yellow, orange and red. Before coloring I cut 8 candles out of kraft cardstock and layered them on my card as a mask. Then I colored around them creating a white candles image.


Then I colored the cardstock candles with the same colors. I added the word faith from Susan Weckesser's Painted Sentiments stamp set and the number 8 with Susan Weckesser stencil.
I adhered the candles to the card with 3D foam tape and my card was ready!


How does the card tell the story of Hanukkah you ask? Well...here's the story...

In 175 BCE, Antiochus invaded Judea.  The second temple in Jerusalem was looted and services stopped, Judaism was outlawed. Antiochus ordered an altar to Zeus erected in the Temple. He banned circumcision and ordered pigs to be sacrificed at the altar of the temple. Antiochus's actions provoked a large-scale revolt. The Jewish revolt was successful. The Temple was liberated and rededicated, it was cleansed, a new altar was built in place of the polluted one and new holy vessels were made. Olive oil was needed for the menorah in the Temple, which was required to burn throughout the night every night. The story goes that there was only enough oil to burn for one day, yet it burned for eight days, the time needed to prepare a fresh supply of oil for the menorah. An eight-day festival was declared to commemorate this miracle - Hanukkah!


Without Faith the revolt could not have succeeded, the temple would not have been freed and God would not have given the Jews the miracle of the oil. This holiday of light was created because of the faith that darkness can be overcome!

Thanks for stopping by
Have fun creating!
Einat

Friday, October 11, 2013

Spooooky House

Hello Susan Weckesser fans! Einat Kessler here with a fun project for Halloween.
The first time I saw the Happy Homestead house stamp I knew it would be great for a Halloween project. It has that whimsical look that can easily be turned into spooky with a few creepy embellishments.


I started with covering a wooden frame with orange cardstock and distressed it a little with distress ink. I stamped the house on black cardstock and embossing it with white embossing powder. Then I added a little orange color and some shimmer with orange perfect pearls. I hand painted bricks with a silver pen. I added a piece of cheese cloth on the roof.


Then I added some fun Halloween embellishments: an embossed skeleton, a hand painted and cut coffin, a hand cut "crazy" pumpkin and a witch on a broom stick.
On the corner I created a spider's web from cheese cloth and added crawling spiders. From behind the frame I added a peeking ghost.


on the upper corner I hand wrote BOO! and added two eye on the "O".
Now all you need to do is add your spooky photo!

Have fun creating!

Einat Kessler
Susan K. Weckesser DT member

ShareThis2

BrendaPInnickColorCafe