Wednesday, June 5, 2013

Come Sail Away, Come Sail Away with Me . . .

Come sail away, come sail away with me . . . dodododooodo . . . Tracy here, I`m singing away over the cutest little boat stamp ever!
Today I have a little project to share using up scraps of wood and old book pages.
I gathered up a few supplies to get started.
A quick coat of Faber Castell Gel Medium over the wood, followed by torn up old book pages . . . I love using old book pages in my projects for a little more added texture.
A quick coat of Acrylic white paint followed by the
Sail Away stamp by Susan K Weckesser/ Unity Stamp co. with a  Jet Black Archival Ink pad.
Then the fun began and eeek I got so carried away I forgot to take any more pics, sorry!
But it`s easy peasy to re create I promise... I started by coloring the waves/sailboat with 
Winsor and Newton water colour paints, the background was created with the blending of
Tim Holtz Distress Paints/Stains with my hands . . . happy, messy, paint, splattered hands.
A little later with very messy hands along with a few scribbles {with a fine black liner}, a little clear embossing powder, some little gem stones, the sentiment from the stamp set all chopped up and the boat stamped again to cut out the sails for a more 3d feel to them ... this is what I ended up with.
I just have to show you this close up, see the scribbles along parts of the stamp, I like to add this to make it more part of the picture and ooooh the sparkle is from the  embossing powder.
Soooo was I finished . . . not yet!
Well, I couldn't leave the back blank soooo out came an inkssentials manilla tag, more Distress paints/Stains,
Tim Holtz Idea-ology Remnant Rubs - words and a little rope for a nautical feel and yep I was done this time.

A little mixed media sailboat art that made me very happy getting all paint splattered!

Thank you so much for looking today

Till next time

Hugs
Susan K Weckesser Design Team member

Monday, June 3, 2013

Cute little journal!

Today I have a cute little journal to show you.  I love retro things and Susan's stamps "Poised and Pretty" are just that.  A throw back from the mid century where life was simpler and all was good in the world!  When I was looking for something to make with these stamps I ran across one of the journals that I have been hoarding and it was a perfect compliment to these stamps.


I started by stamping the lady onto some paper and cutting her out.  I re-stamped her on a piece of Susan's paper and cut out her dress.  I pasted her onto the cover of the journal and added her dress on top.


 I gathered up some embellishments to decorate the rest of the cover with "sewing type notions".  A spool, measuring tape, scissors etc.


This is the journal that I started with, it already had two similar type ladies on the front of it.


I then stamped the remaining two dress stamps onto scrap pieces of Susan's paper and cut them out.  I then backed them with pink card stock and punched a hole in the top of each one.  I added a gingham ribbon to the top of each one of them.


Here is the journal all pieced together.  The ruler down the side is washi tape and I cut out the hat stamp as well and put a flower on it. It was placed into her hand like she is holding it.


This is the overall shot of it.  The two dresses are book marks that you can leave in place to mark special items of interest. I love it! It is so retro looking..not sure yet what I will use it for, maybe just my everyday thoughts or idea I have for scrapbooking or crafts...


Thanks for stopping by this week and taking a look.  I had fun making this little item with Susan's stamps...take care....see you next time!  Jennifer

June Create to Live Challenge

Live-to-Create-Challenge-June_thumb4
Oh, those fresh summer sounds, sights, and smells; the sound of the lawnmower and the smell of fresh cut grass – the sound of the ice cream truck and the taste of smooth cold ice cream on a hot day – laughter in the backyard and watermelon seed spitting contests – bright blue skies dotted with butterflies and dragonflies – oh how we love the romance of summer!
How would you challenge yourself with this month’s challenge? What sounds, sights and smells always brings a fresh summer to your mind?
This challenge is for you to use the color and message themes in the picture above. Take some creative liberty here to create based on how this picture makes you feel. What does it inspire in you? What creative ideas jump out at you first?
Create a project to share with us based on this picture above. Write a blog post and share your project. Come back here and link-up your blog post in the challenge submission in our sidebar to your left. After you post your project, make sure to tweet about it, share it on Facebook and Pin it as well. I’d love to see little ‘blooms’ of inspiration this month all over.
Use hashtag #createtolive when tweeting or pinning so we can find and share your posts too!
Your project can be a layout, a card, a mixed media piece, or anything you create using this picture as your inspiration. Using Susan K Weckesser Inc products are not required, but are ALWAYS welcome. :-)
CTLJunephoto-12_thumb2
Our prize package this month is …. Little Haven, Susan K. Weckesser/ Unity Stamp Co. Stamp Clearsnap inks, and a Susan K Weckesser Inc stencil. So, pull out your supplies and play along - And don't forget to submit your blog post with our sidebar submission Inlinkz widget!
and now for the winner of our Create to Live May Challenge….
…… Winner was randomly chosen and notified by Inlinkz Random Picker….
... and…
IMG_3105-800x794_thumb
“Below is a list with the winning links:
3 . RENEE JOHNSON
Thank you for playing, RENEE , and we love how you used this challenge to CREATE this layout. Hugs, girlie! Let us know if you did not receive your notification email!
Have a wonderful weekend everyone and we can't wait to see what you create up next!
xoxo

Thursday, May 30, 2013

A is for Art!

Or in this case, it stands for Aili, my daughter.  (It rhymes with smiley, in case you are wondering!)

Hello, everyone!  It's Sue Sykes here today, a little bittersweet that this is my last day to share a project as a Guest Designer with the Susan K. Weckesser team.  Susan and the ladies have been wonderful and welcoming, and I'd like to send them all a little note of thanks!

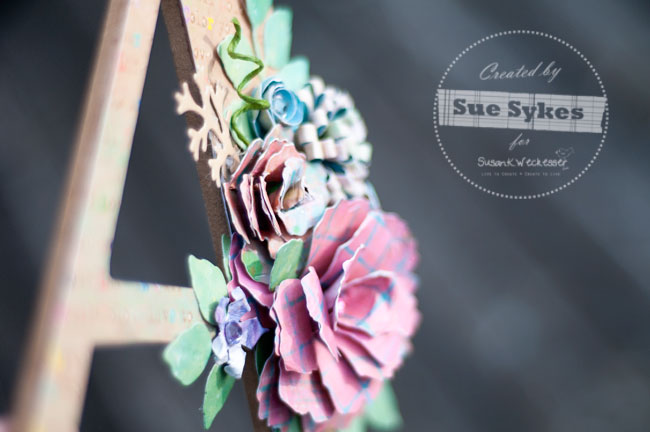
Today, I'm going to share an altered project with you.  I have a box of "alterable" items that I keep for when inspiration strikes.  I found this thin wooden alpha in there - I had purchased it a while ago at Michael's during a US shopping trip.  I knew I wanted to alter it for Aili's shelf in her room but wasn't quite sure what to do.  Susan's whimsical papers were perfect!

Supplies used:  Wooden letter; Susan K. Weckesser Whymsical Paper; Plaid ModPodge; Sizzix Tim Holtz Alterations die (Tattered Florals); Spellbinders die (Foliage); My Favourite Things Dienamics dies (Loopy Bloom, Large Rolled Rose, Rolled Rose, Mini Rolled Roses); Recollections paper tape, wire, rhinestones; water mister; hot glue gun.

I covered the letter with patterned paper and ModPodge.  While waiting for it to dry, I cut all of my flower pieces and foliage from various papers and created my flowers.  Once the flowers were completed, I adhered them, one at a time, beginning with the largest flowers.  After all the flowers were in place, I tucked in my foliage as needed, and added rhinestones as accents to a few flowers.


The corkscrew tendrils were created by covering thin wire with green paper tape and curling around the handle of my paper piercer.  So easy and adds great texture!


Here's a view from the right and left sides.


Thanks again to Susan and her team for their kindness and inspiration over the last few months!

Cheers,


My blog:  Kewl Beans

Monday, May 27, 2013

Banner Gift Card and Tag Set

Susan sent me some stamps recently, one of them being Celebration of Simple set.  I LOVE these over sized banner stamps!  I started by stamping each of the images onto scrap Susan K Weckessar paper.  I stamped quite a few as I knew that I wanted to make a back ground with them.  I cut each one out around the outer line and ended up with this.


I then made a card base using some kraft paper. 


I them took the stamped images and layered them onto the card base and moved them around a bit till I was satisfied and then glued them down.


I then flipped it over and cut off the edges to square it up using the original size of the card.  At this point I decided to make a tag as well which can go on the outside of the bag and the card to go on the inside of the bag.  Tag was made from left over piece of kraft paper, corners trimmed to make and

angle on the top corners.


The I took a few stamps I have never used before, but love the images of them, and stamped them on the kraft paper as well, I cut them out and pop dotted them.  The images are of circus animals and thought that went well with this stamp set.  Here they are aren't they cute? 


Here is the finished product!  A fun card and tag for a birthday, celebration or any even that you want to celebrate!  Just add to the gift.  I added a bit of bling to the center of the black dots as well as some sparkly ribbon.


Thanks for stopping by this glorious Monday...have fun and take care till next time. 
 
 
Jennifer


Friday, May 24, 2013

Look Who is Joining the TEAM!

20090109_309Join us in Welcoming Sherry Mendoza to the Susan K. Weckesser Inc. Team!

Sherry will be taking up the role of Business Coordinator. How cool is that!!! Sherry  is a happily married Mum of four who has been working in the paper crafting industry for over 8 years. Sherry is experienced in many areas, including project and product design, marketing, social media, editorial and education. She loves to dabble in all different styles from simple and stylish to messy mixed media, it really depends on her mood and what she is inspired by when she is creating.  We are so glad to have her joining our team.

I know that you have met Lynne Mizera.

Isn’t she AWESOME!!! She is now part of the Susan K. Weckesser Inc. DT. See what happens if you are a guest…we might want to keep you forever!!

We have some super COOL things planned in the near future and we are going to need your HELP! SO….stay tuned!!  I am so excited…. because it means….

COLOR + FUN = HAPPINESS

Sneek Peak 1

Did you like my super {SMALL} sneak peek!?! Yup…I have been busy!

Hey, Remember, if you would like to be our guest……..Guest Designer Call

Have a WONDERFUL Day!!!! Remember to find something that makes you smile today!!!

hugs,

Susan

Wednesday, May 22, 2013

Making Your Own Patterned Paper...

Hello Friends! Lynne Mizera here to share with you how I made my own beautiful patterned paper using Susan's Autumn Grunge stamp set from Unity Stamps.

To create this page I used watercolor paints but you can use inks or sprays or gelatos for this three-step, embossed-resist technique.

 
The process involves laying down some color on a blank page and stamping and heat embossing twice more to create all these lovely colors and layers.  Follow along as I show you how I created the patterned page below. 


I used a sheet of 90lbs Multi-Media paper with a vellum finish.  The vellum finish is important because it will allow you to wet the paper over and over again without it breaking down. 


I start by painting the entire page with my lightest color and I make sure it is completely dry before I add my first layer of heat embossed stamps using a watermark ink and a clear embossing powder.

Here you can see the paint detail before the excess has been buffed off
After I am happy with my first layer of stamps I add a second layer of paint colors up to my medium darkest value, saving my darkest colors for the final layer.  I paint right over top of the embossed images.

Add caption
When the second layer of paint has dried slightly I use a wet wipe to gently remove the paint from the first set of embossed images and to blend and lighten the colors on my page if they are too dark; Make sure your page is thoroughly dry before you add a second layer of embossed stamps incorporating the new colors. I keep adding color, removing it slightly and stamping and embossing until I like the effect and I have enough images on my page.

On this page you can see where I used a wet wipe
Finally I apply my final layer of paint in the darkest values, allowing it dry slightly and then buffing off any excess paint from all the stamps so they really pop off the page.   

The darker the background color the more your stamps will emerge from the background. (see the detail below)

I love using Susan's Autumn Grunge stamps for this technique... this detail photo shows you the rich color and multi-layering on this page... the possibilities are endless.

Thank you so much for stopping by and sharing my very first post ... now go and make some of your own original patterned paper!
"Scrapbook Lynne" Mizera


ShareThis2

BrendaPInnickColorCafe