Showing posts with label home decor.. Show all posts

Tuesday, October 18, 2016

Mermaid Kisses

Greetings!  Joyce Shaulis here to share another mixed media project with you for our October theme.  I love to go to garage sales and find hidden treasures.  On one of my excursions, I found this cute wood boat oar.  It has been packed away until now when this inspiration struck!


Here is a photo of the original oar- it was a nice piece meant for decorative painting or crafting.  It is 24" long and 5 1/2" at the widest point.


First, I began by using Susan's new co-branded stamp, "Spirit of a Mermaid" and stamped the mermaid with Mystery mini POP ink onto white cardstock.


Then I painted both sides of the oar with gesso.  When it was dry, I used Decoart acrylic Bahama Blue to paint the sky and water.  I used the color Sand to paint a shore and extended it out to cover the whole handle of the oar. 


For the mermaid, I used markers to color her in.  Then I cut her out with scissors. 


Next, I painted the lower section of blue in Calypso Blue.  Using Bubblegum Pink and Cadmium Yellow, I blended in lines of color in the sky and also a little of the water area. I then adhered the mermaid to the oar with Decou-page.  Then I used a bubble rubber stamp with Snow mini POP ink to stamp onto the water and over the mermaids lower body.  Allow ink to dry. 


With a pencil, I wrote out lettering.  With a small brush and a small stylus I painted the letters in Electric Pink acrylic paint. 


To give a dimensional effect of a sandy beach, I took rice paper and glued it down with Decou-page over the sand painted area.  I rippled it in areas  to give the effects of  sand hills.  Then I stamped Cocoa mini POP ink onto a foam tray and took a small damp paintbrush to brush the ink over the rippled areas.  I also cut out some small fish and starfish from tissue paper to adhere with Decou-page in the water and on the shoreline. 


Next, I took a charcoal pencil and edged around the fish, starfish, mermaid, shore and water line.  I gently smudged the charcoal lines with a Q-tip.


With hot glue and glue gun, I glued small seashells and sea glass in several small groupings on the beachy sand area. 


To finish up, I edged the perimeter of the oar with Mystery mini POP ink, just swiping the edges with the ink pad.  I buffed the ink a bit with a paper towel. 


To finish up, I coated the whole piece with Decou-page and sprayed the piece with matte acrylic spray. 


Thank you for visiting my blog today and I hope you enjoyed finding another way to use this adorable mermaid stamp.  The possibilities are endless!!

Joyce Shaulis     Susan K. Weckesser Creative Design Team

Susan's Products used:
Spirit of a Mermaid  https://www.unitystampco.com/
Mini POP inks: Cocoa, Snow, Mystery  https://www.clearsnap.com/

Other Products used:
wood oar
Decoart paint, gesso, Decou-page, matte acrylic spray.  Paint colors:  bahama blue, bubblegum pink, cadmium yellow, electric pink, calypso blue, and sand.  https://decoart.com/
rice paper
seashells and sea glass
fish and starfish from tissue paper design
hot glue and glue gun
charcoal pencil
rubber stamp with bubbles
markers  https://kuretakezig.us


Tuesday, July 19, 2016

Summer House Project Bucket List

Hello all!  Brooke Bock here with my very first project for the Susan K Weckesser design team.  I am thrilled to be a part of it...

I recently finished a summer studio space.  I have clean counter tops which is a rarity for me.  I wanted to create a Summer Bucket list for projects I have for our house and yard and I have the perfect spot picked out on the counter top for it to keep me inspired to get all those projects done.


I started with an old Reader's Digest book that was being discarded at a local book sale.  I removed the cover for another project and then carefully folded each page in half.  This is a great way to enjoy a movie and some inside time when it is hot outside.  Once done, it is so versatile.


Next, stamp your designs using the Tumbleweed Houses set and the Mystery Stamp pad.


Next, color them in. After they are colored, punch out each house.


Here comes one of my favorite tricks. Get out all those lovely Susan K. Weckesser Color Pop Mists and all the images you just punched out.


Ink the edge of each circle.


That one simple step makes them pop.


Next, punch some circles from the Color Burst paper.


Adhere the Color Burst circles to the backs of the house images.  Write each task on a tag.


Next, place them in your book file.  As I complete each task, I turn the tag around.  Having them on the counter top  reminds me of my goals. You could easily adapt this project for any other bucket list.


Brooke Bock...Susan K. Weckesser Design Team Member


Monday, July 4, 2016

A SWEET Home Decore Idea Using Sharpie Markers...

Happy Daaaay Everyone!  Lynne here today sharing my first project for the new Susan K. Weckesser Creative Team.  I am so honoured to be a member of the 2016-17 team and super excited to share my latest creation, which is something a little bit outside of my usual offerings.
This July we are celebrating our Homes so I decided to alter this canvas wall hanging I have been saving (hoarding?) for several years with the intention of hanging it in a corner of my new studio space where I like to sit and use my paints, draw and color. 
Now just so you know, I don't usually "DO" home decor items. Don't get me wrong, I LOVE to decorate my home but with stuff other people have made, because my feeble attempts at making my own usually fail Big Time (grin).

But because this project was so simple and required no special skills or power tools, just some  ink, some stamps, my Sharpie markers and Ranger Stickles and Liquid Pearls... I think it turned out Beauuuutifully... Smile.
I used several of the Susan K. Weckesser Unity Stamp sets to create this super sweet, colorful and happy hanging,  (all listed below) and I have created a photo tutorial HERE on my blog if you are interested in seeing the entire process in more detail.  I do hope you like what I created for my first project for this new term and that it inspires you to create something of your own to honour your "Home Sweet Home".

For the Susan K. Weckesser Creative Team

Susan K. Weckesser Stamp Sets used for this project:
At Ground Level

Fly Away

the Happy Homestead

What's Up Gnomey?

Other items used for this project:
Sharpie Markers
Ranger Stickles & Liquid Pearls
Ranger Archival Ink


Wednesday, July 23, 2014

Altered Clock


Hello Friends!! Welcome to the SUMMER BLOG HOP between UmWowStudio and Susan K Weckesser Inc. We'll be sharing gorgeous bright and shining inspiration with you from both teams all week long. Be sure to keep visiting, hopping and commenting to enter to win one of TWO prize packages. Each day is chock full of goodness and we don't want you to miss a thing.
Hi everyone Steph Ackerman here today with a fun little altered clock.   I used some awesome Susan K Weckesser papers from the Live In Color Collection and, as we are partnering with UmWow Studio this month, I used some awesome chipboard elements.

I found this clock recently in my local craft store. Because it was missing some pieces, I was able to get it on clearance and modify it as I wanted!

I first painted the wood base with Art Anthology's Copper paint, then used some of Susan K Weckesser's Live in Color papers to cover the front and sides of the clock.  I wanted a little of the painted wood to show, so I cut the papers slightly smaller than the wood panels.


I used Mod Podge to adhere the papers and, because the papers are a good strong quality, I was able to adhere the papers without bubbles. 


The floral paper was perfect to adhere along the sides of the clock.  I love how the flowers appear to be growing up the sides.


An assortment of flowers was added to the bottom corner of the clock with brads and glue dots.


I used some fun chipboard elements from Umwow Studio - a Swallow which I inked and then stamped with a phrase from Grandma's Needlepoint stamp set  and several banners which I inked and added amongst the flowers.


A close up of the flower cluster.


I love how it turned out and wish I had a few more to alter!


Thanks for stopping by today.
Steph Ackerman
DT Member for Susan K. Weckesser


Here is the lineup for the week.  Again, don’t forget to leave a comment each day to be entered to win one of TWO surprise prize packages! We will pick winners after July 27 and announce on both Susan K Weckesser and UmWowStudio blogs


Monday, June 23, 2014

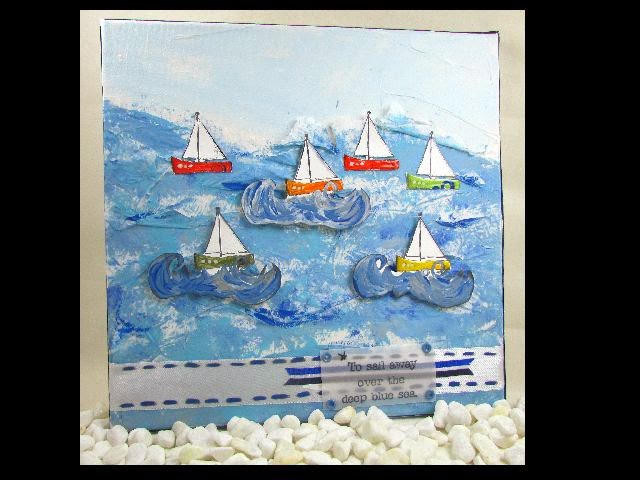
Come Sail Away

Welcome to my first post with the Susan K Weckesser Design team.
Let me share a canvas I made.
I must say I had so much fun creating with this adorable  Sail Away  stamp set created by Susan K Weckesser from Unity.
Let me share a few steps I did to create.
 This is one of my heavy paper pads that I stamped several copies of the Sail Away stamp.

The 12 x 12 canvas was easy to prepare. I put a layer of Mod Podge down and added torn sheets of tissue paper to add layers.
 While the canvas was drying I was able to work on painting the Sail Away  images. I loved mixing and blending several colors and allowing them to dry.
 One important step is to make sure all the tissue paper is trimmed and pushed down on the edges.
 Look how easy it is to blend and make the sea background, I left some white tissue exposed.
Once all the  Sail Away images were dry I was able to fussy cut them. 

 I used Susan K Weckesser's stencil to accent my thick white ribbon, first with ink and then with paint. I stamped and embossed the sentiment from Sail Away on a piece of vellum. I attached the sentiment with some eyelets and layered it on top of a tri-blue piece of ribbon.

 Wanted to share a close up of all the images~I pop dotted all the larger images with the waves. I also decided to cut a few extra images and cut out just the sailboat. I also decided to add some clear lacquer to make the sailboats shine!
 Thanks for your visit, would love to hear what you think of my first canvas project .


ShareThis2

BrendaPInnickColorCafe