Showing posts with label stamp. Show all posts

Thursday, December 18, 2014

"Let it Snow" Puzzle Cards

For Christmas this year we decided to give a trip for our kids and not gifts, so to reveal this fun present to our kids we had them each open 3 presents (the cards below) with clues of where we were going, so 9 clues total were opened at an early Christmas present opening with my parents.  On each card I wrote a portion of a sentence giving a clue of where we were going.  It reads, "For this Christmas our present to all of you is to spend our time together having fun and lots of cheer.  So bring your magic and your swim suits for we are going to a very special place full of lots of wonder and joy."  


On the back side of the cards were numbers stating which row the card was in (to make it a bit easier) and a letter or two that they had to arrange to spell the words "Great Wolf Lodge".  The screams of excitement were deafening as they figured out where we were going.


The cards each measure 4 x 4 inches, so once together it creates a 12 x 12 page.  The colors of the papers and the cute diecuts were just perfect for this little project!!


For some of the cards I used the super cute "Let it Snow" stamp set from Susan K. Weckesser.  The snowman and phrase were just a perfect fit for these papers.


http://susankweckesser.com/design_team

So even thought there are not true presents to be opened this year, our trip is worth so many more memories than any toy can give.

Supplies used
Cardstock - Bazzill - Dec Birds of a Feather Kit
Pattern Papers - BoBunny - Dec Birds of a Feather Kit
Diecuts - BoBunny - Dec Birds of a Feather Kit
Stamps - Susan K. Weckesser
Ink-  Ranger
Pen - Faber-Castell

Monday, June 16, 2014

Winners of Susan K Weckesser and Unity Blog Hop

photo (1)
We had a great time for our Susan K Weckesser and Unity Blog Hop last week and we have 2 Winners selected from our blog.
Each winner will get a $25 Gift Certificate to Unity Stamp Co Plus the new Susan K Weckesser stamps!
Our Winners are:
Having so much fun on this hop! Sorry I didn't have any of the new stamps to use on my hop post. I can't wait to get some. I really love gnomes and houses and I'm completely in love with the patterned papers I've been seeing on the hop!!
and…..

Helen AshenfelterJune 13, 2014 at 10:05 AM
Thanks for gnoming what is fun!

You can visit Unity's blog to see if you were a winner there!

PLEASE SEND AN EMAIL TO:
kelli@unitystampco.com
Include your Full Name and Address.
Also mention you won a "Unity & Susan K Weckesser Hop Comment Prize".
{please claim your prize within 2 weeks}

Thanks again for hopping with us and Unity Stamp Company.   Don’t forget to share any projects you make using Susan K Weckesser designed products!  We love to see what you create.  

Thursday, February 27, 2014

Friends Are The Family We Choose Card

Hello friends!  Happy Thursday!  It's Lee-Anne here and today I wanted to share an extra special card I created with Susan's amazing stamps and papers to give to a dear friend of mine.


I just LOVE The Happy Homestead Stamps.

 I first stamped the house stamp with black archival ink onto white card stock and then "painted" it with some mists to coordinate with Susan's Live In Color Collection of patterned papers. 

 After it was coloured and stamped, I popped it up on the card with some pop dots.  I then stamped the word "family" onto white card stock, cut the letters out separately and adhered it to the card.  I fussy cut the sun and adhered some yellow twine and placed a large sequin  in the center of the twine and adhered it to the card.


 Right now I am loving the sequin trend so I wanted to give a little more texture and dimension to the house roof so I adhered some pink sequins to the roof.


Finally I fussy cut a cloud, flowers, grass and a bird out of the Live In Color Collection of patterned papers and adhered them to the card and used some tiny letter stickers to finish the title.  


I am happy how this came together.  Thanks for stopping by and I hope you are inspired to create a card for a friend.

Lee-Anne

Supplies

Cardstock - American Crafts (White)
Letter Stickers - Tim Holtz
Patterned Papers - Live In Color Paper Collection by Susan K. Weckesser
Rubber Stamp - The Happy Homestead by Susan K. Weckesser & Unity Stamp Co.
Sequins - Teresa Collins
Sprays - Heidi Swapp Colorshine (Primrose, Mint Green, Black Velvet, White)
Stamp Ink - Archival Ink By Ranger (Black)


Thursday, February 20, 2014

happy card

I love to use flowers and girly things on my cards and projects, but sometimes I want something more masculine, especially if it's for my husband.  I find that a great substitute for flowers are gears, and there are so many varieties out there in chipboard, acrylic, stamps, stickers, and punches.  So here is a card I made for his birthday this year.


I am loving paint splatter right now, I seem to be using them in just about every project, but they really add to the dimension and depth to your paper for very little effort and cost.  I then on top of the splatters used some of Susan K. Weckesser stamps around the edges and borders of the card for more dimension and texture.  I kept to earth tone colors for a rustic look, I felt that it just added to the masculine feel.


I was not happy with any of the alpha letters I had on hand, they were not the correct size, wrong color, wrong font, etc.  So I took something that I like the size and font and altered the color.  These were foam "Thickers" in grey.  I pressed my distress ink by Ranger in a dark brown on top to give it a darker look and distress the letters a bit.


Here you can see some of Susan K. Weckesser stamps up close.  I used the "banner" and the "create your day" stamps.
http://www.susankweckesser.com/welcome


I love Susan K. Weckesser papers.  The a fun, flirty, and whimsical.  I took a small section of one of her papers to make these banners. 
http://www.susankweckesser.com/welcome


Play with your stamps and inks.   You can get such wonderful results by layering and just letting your project go where it needs to go.

Supplies Used"
Papers - Susan. K Weckesser and Core'dinations
Stickers - Glitz and American Crafts
Ink and stain - Ranger
Stamps - Susan K. Weckesser
Chipboard - Creative Embellishments
Twine - May Arts Ribbon
Staples - Ranger

Enjoy!!

Tuesday, February 11, 2014

Altered Art

Hi Jennifer here again.  This week I have another mixed media art piece to show you.  I started with the cover off of a Tim Holtz box and I covered in a specialty paper I got at the scrapbook store.  I used Aleen's Tacky Glue to adhere it, then I covered the edges in washi tape

I had a variety of different items I wanted to use, the main item is from Susan Lenart Kazmer line of items it is the 'at' in the box.  The frame is a metal one I picked up at the antique store and the star is from a Christmas ornament. The wings are from Maya Road and have been sprayed with Tattered Angles and inked. 

I made a backing from cardboard to cover it all up and glue it all down.  I added other items it it butterflies, flowers, letters, bling etc. 

I stamped one of SKW ladies out and cut here out and put her into the spool. I think she fits in really well.


I hope you like it.  I am planning on putting some Tim Holtz feet on it as well at some point tried to buy them today but they were all out at the store.  I really enjoyed making this Altered Art piece and will be keeping it in my scrapbook room.
 
Bye for now Jennifer


Tuesday, January 28, 2014

A Little Vignette


Hi Jennifer here!  I have become seriously addicted to using this little girl stamp and making small altered items with here.  This is my third little item I made and I am very pleased with it.  I think I am going to have a little display of all the items I make with her. 

 
I found this little paper mache box on the Christmas sale table at Michael's and thought it would make a good vignette or diorama to alter. 


I started by cutting out some bits and pieces of images from Susan's papers and stamping a few images from the set onto brown paper.


I also gathered up a few embellishments, flowers, etc and started to layer everything together, pop dotting the images together.  Here are some close ups of the final product. 


Here is the final project! 
 
 
Hope you enjoy it, someday I will photograph it with the other two items I have made with this stamp.  I simple love it.  Hope everyone is doing well, take care till next time!  All the best Jennifer


Friday, January 24, 2014

"Home is where the heart is" canvas

Hello dear friends, Einat Kessler here with a mixed media canvas. Directly from the CHA show I wanted to share with you the project from the amazing workshop Susan and I taught at the show.


Start with a 6"X6" canvas and paint it with teal, yellow and green acrylic paints. water your brush and blend the colors to create a more uniform background. Then add patterns using the ever so fun Susan's stencil using distress ink and a blending tool.


Stamp the house stamp on white cardstock and then color it with Pan Pastels. I like to use a baby wipe as my brush. it has a really nice wash effect and you have more control of the areas you color.


Color some white paper flowers in the same technique. Stamp the canvas with some washi tape stamps from the "A little bit washi" stamp set and a sun from the "Fly away" stamp set. Use permanent ink so it will stay on the canvas and not smear.


Cut some flowers and butterflies from the Beautiful Daydreams patterned paper and write the title on a white cardstock. Assemble your canvas, adding the house and all the embellishments. Add little swirls using the number 9 on the stencil in different directions. To finish the canvas add some distress ink and Pan Pastel to all the edges of the canvas.

Have fun creating!
Einat

Thursday, January 23, 2014

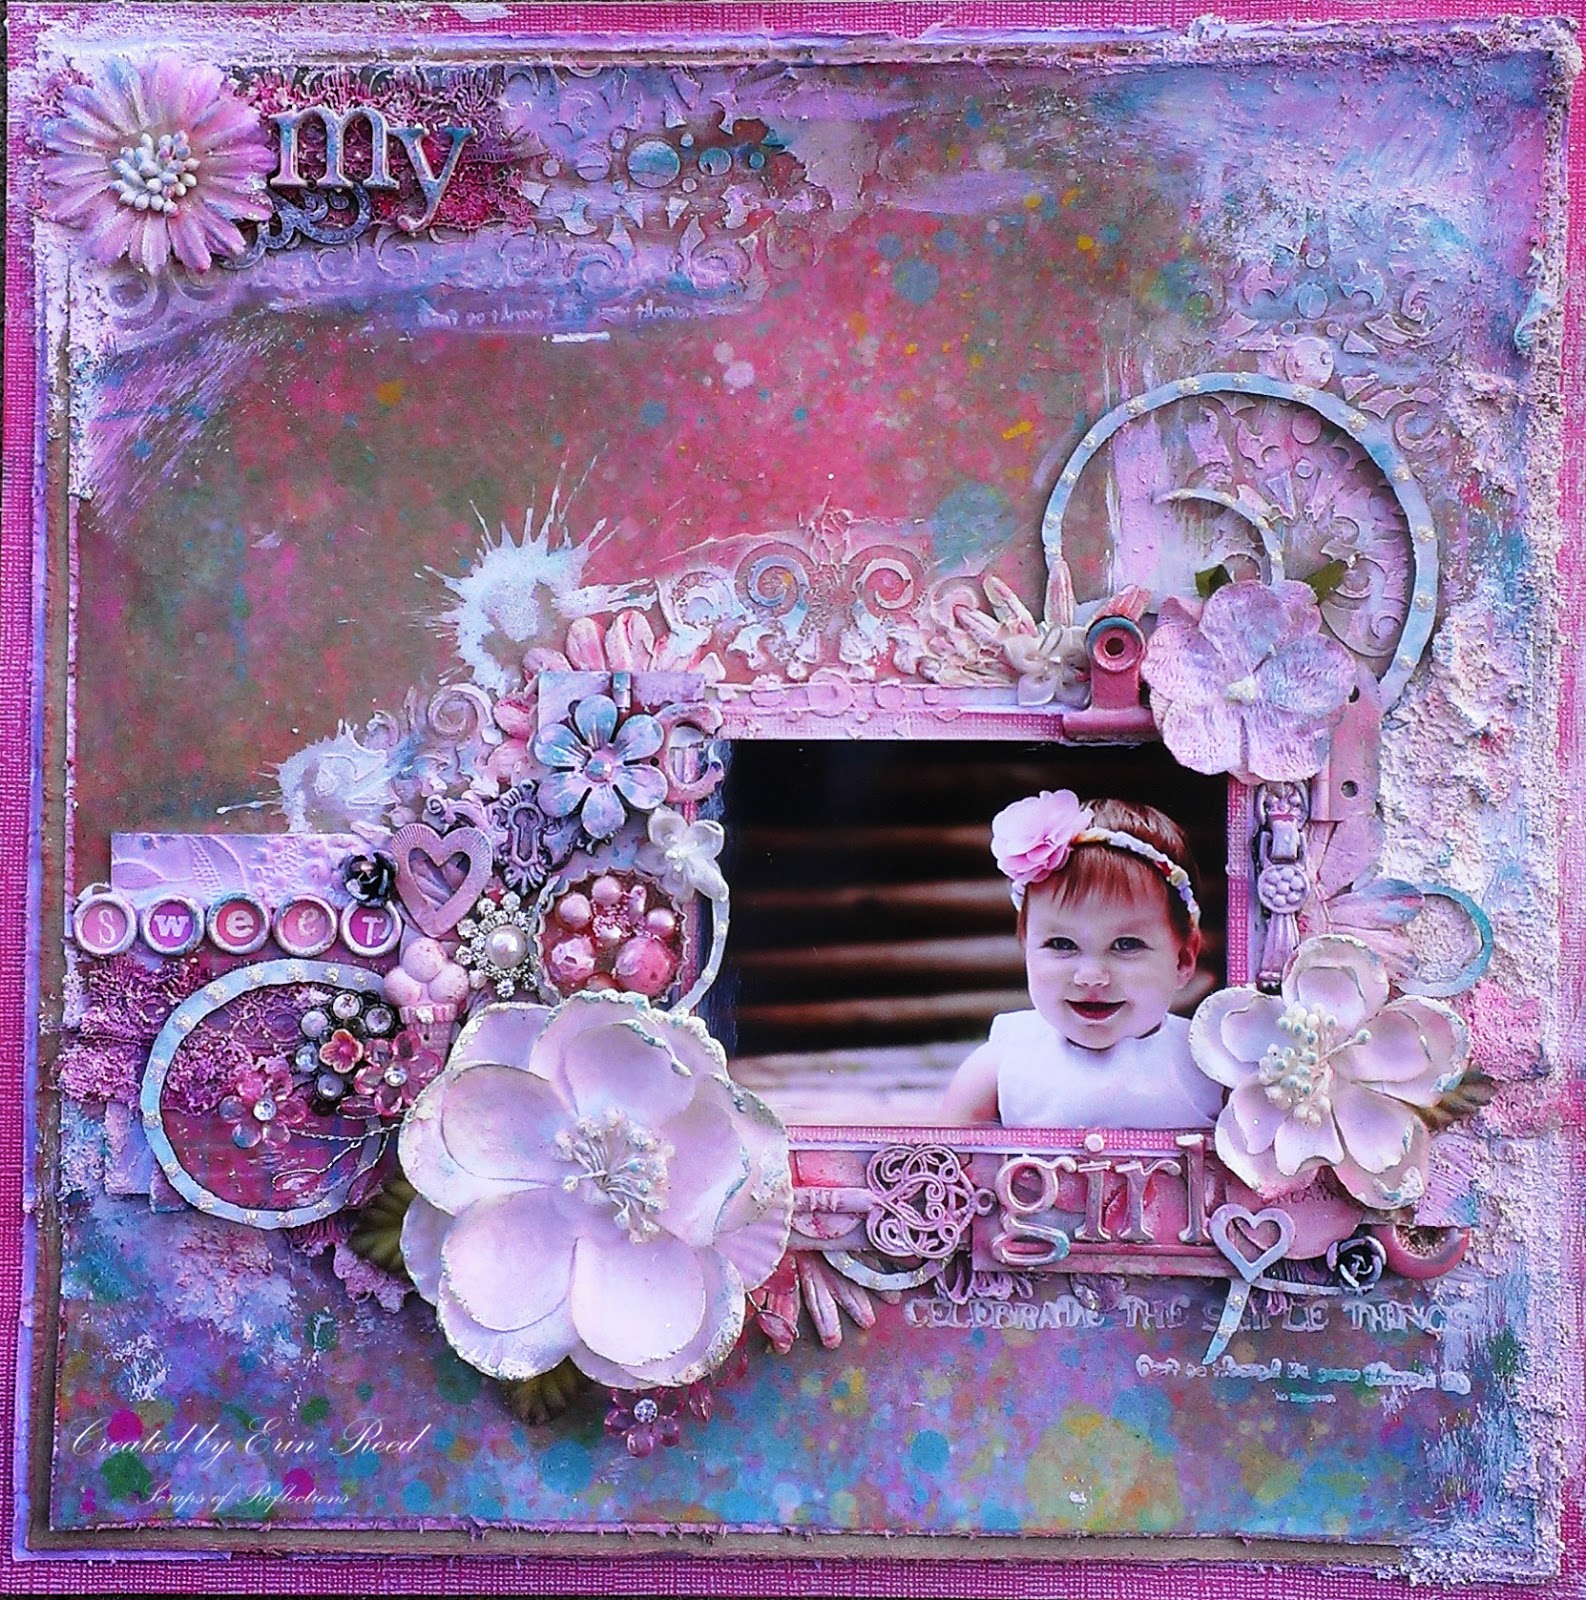
my sweet girl

 For Catherine's first birthday we had a few pictures taken by a friend, and they turned out wonderfully.  This is one of the beauties that came out of that shoot.
 

I love the look of mixed media, playing with your embellishments, creating texture, looking around the page at all the fun different items, but never taking away from the picture itself.  That is part of the art, not letting the page "eat" the picture, but letting the page enhance the picture.  

Below is my methodology of how I build a page - a peak into my head so to speak.  Sorry for the lighting on some of the pictures, I did not always have the best light available as I was building my page.
How to Build a Mixed Media Page

 1) I start with the papers.  I look for papers that correspond to my picture, I want to complement it, not fight with it.  I used my daughter's hair bow (since the rest of the picture is brown, flesh, or white I used those colors (pink, teal, white, etc).  The papers from Susan K. Weckesser were a perfect match, they just begged to go with this picture.

http://www.susankweckesser.com/welcomehttp://www.susankweckesser.com/welcome
 The "color burst" paper was perfect for the background, and then I added in the "bouquet" and "beautiful days" as layers.

2) I this point I have a sketch in my head of the design of the layout, I know I wanted the picture in the middle right, with elements going above and to the left of the picture.  I start pulling items that I think will work on my page, not caring about color, just the shapes.  Not all the items will make the cut and be used, but this gives my an idea if I like where I am headed.  Nothing is glued down, it is just my rough idea at this point.


3) I apply gesso to all the embellishments that need a change of color (except for the top lace it was white so it took color no problem).  The spray them with spray mist.  I used Tattered Angels mist in a couple of different shades of light pink. I mist them each 2-3 times to give them a good coat.  I also let them dry before each coat so they absorb the mist better.  I do this off the page so I do not apply to much mist to the background papers.


4) Now I add texture to the page.  I used stencils by Prima with gesso, added in my papers (distressing each layer of paper with scissors and edging them with ink) and trims, and for fun I added in layers of Snowtex.  I gives this wonderful bumpy texture.  I even took a couple of Susan K. Weckesser stamps and stamped in gesso below the picture and in the top left corner below the lace and stencil area.  I used two small phrases found on the stamps sets below "Celebrate the simple things" and "Don't go through life, grow through life"

http://www.susankweckesser.com/welcomehttp://www.susankweckesser.com/welcome


5) Now I start to add my embellishments back on.  I do not have the picture glued down yet, as I might still spray and I don't want to damage my picture.


6) I start to glue down items as I like to way the looks in that location.  I sometimes take pictures and step away for the page to see how it looks a hour later (especially if I am waiting for something to dry).


7) If I feel there are dead or blank areas, I will either add in another embellishment (or two) or add in more texture.  I did this just above the picture, it felt it was missing something so I added another bit of stenciled gesso.  I also sometimes move things around or change the item completely.  I just let the page go with the flow.  I don't fight to make it work, because I find it never looks good if I do that.


 8) One of the last steps is to go over the gessoed embellishments one more time with paint or chalk ink, sometimes both.  This help them pop out of the page a bit.  I might even add a bit more gesso to the items so they don't look to pink. it adds contrast.  I also leave some items plain, or without gesso like bling and such.  On this page I also added on some glitter via Stickles from Ranger in Crystal for a bit of sparkle.


 9) You can see some of the texture and the Susan K. Weckesser Stamp


Supplies Used:
Cardstock - Core'dinations
Patterned Paper - Susan K. Weckesser 
Flowers - Prima and Petaloo
Media - DecoArt, O'Leary paint, Liquitex,
Paint, Mist, Sprays, glitter - Ranger, Tattered Angels, Martha Stewart
Metals - Prima, Momenta,  and Other
Chipboard - Memory Maze
Stamps - Susan K. Weckesser
Mask - Prima
Trims and Lace - Other
Found Objects - Other

 Enjoy!!
http://scraps-of-reflections.blogspot.com/
 Erin Reed Design Team Member

ShareThis2

BrendaPInnickColorCafe