Showing posts with label Guest Designer. Show all posts

Thursday, January 21, 2016

#tagsoflove with Guest Designer Tamiko

 Hey hey good people!  My name is Tamiko and I am a guest designer for Susan K. Weckesser's {My Sweet Earth} today!  What an honor it is to work with stamps and papers that are complete must haves to any card maker, scrapbooker or mixed media artist's arsenal!  In a perfect life I would get Susan's stamps and papers with EVERY release of new product! ::chuckles but I'm not kidding!::  Here's my project!


As many of you know by now the month of January is the #tagsoflove where the all of the artist will get an opportunity to share the use of Susan's products on or in the form of tags.  For me tags are super fun and believe it or not, I always stick magnetic adhesive on the backs of mine.  One reason is because they are cute you just wanna save them.  Two to remind you/recipient that someone loved you enough to give a small piece of them and their artistry, in the form of a tag and now you can display it in your happy space. ::smiles::

I actually love stamping the little images of the girl, from the Love Ya Bunches stampset  with archival inks, maybe 10 or so at a time. (hey don't judge me ::laughs::) Who needs a coloring book, when you have images like these to play with and color!??! When creating each tag I laid down some color with Dylusions paints after applying  a little white gesso. With two of my tags: I then did a layer of clear gesso to take away some of the shine you get from the dry paint. My sparkle? That I stenciled with a Tim Holtz stencil is Snow Tek, by Deco Art!  I love that stuff! You can paint over it to color it or leave it as is.. and it creates the most beautiful sparkle, without the glittery residue! Did some fussy cutting and added papers and images to the tag with Helmar 450 Quick Dry Glue.  My third tag consisted of a plethora of colors and marks I made with the Grunge stamp set that totally got hidden away with the use of my dark blue gelatos by Design Memory Crafts. Once the blue gelatos were down, I used baby wipes through an Artist Cellar stencil to wipe away some of the blue, exposing the colors and markings underneath.  Totally fun and I have a new babywipe full of colorful blue loveliness for the next project, haha!  Here are a few more shots of my three tags..


Really hope you enjoyed seeing my tags as much as I enjoyed creating them for you!!  Don't forget if you make any tags this month with Susan's products, tag her and use #tagsoflove so your creations can be found!!  I know I'll be looking for them!!  Well I am off to play and it's truly been a pleasure!  Have a great week and don't forget to subscribe, to stay up to date with everything that's going on at {my sweet earth} .  Have a WONDERFUL rest of the week!!


Tuesday, May 6, 2014

Happy Birthday Gift set

Hi everyone, Steph Ackerman here today and I am thrilled to be the guest designer this month for Susan K. Weckesser.  

I received  the Live in Color Collection.  This is a gorgeous collection of whimsical images and beautiful colors and knew they'd be perfect for a gift ensemble.


The gift bag was originally pink and was somewhat faded by the sun.  Using the new ColorBox  Chalk Inks  in Harvest and Splash, I rubbed the ink pads across the gift bag, mixing the colors.  The colors of the inks coordinated really well with these papers.


I cut the Beautiful Daydreams paper to fit the gift bag, matting it with gray cardstock.  Then I fussy cut a cloud and the kite, adding them to the gift bag with foam adhesives for dimension. 


Not wanting to waste any papers I had left, I created a coordinating  birthday card with the remaining paper and stamped "Happy Birthday" on a die cut oval I had left over from my previous birdhouse project.  I then matted it on several other dies before adding it to the card. 


Thank you to Susan K. Weckesser, Inc. for giving me the opportunity to be a guest designer this month.  And thank you for stopping by today.

Steph
 

Sunday, April 27, 2014

Live in Color Birdhouse

Hi everyone, Steph Ackerman here today and I am thrilled to be the guest designer this month for Susan K. Weckesser.   When I first saw Susan's papers and stamps, I fell in love with them and knew I wanted to design with them.

I found this wood birdhouse and knew it would be perfect for the Live in Color Collection.


These papers are wonderful with their whimsical look and soft color palette.  I used different papers for each side of the birdhouse, cutting them slightly smaller than the birdhouse because I wanted the edges of the birdhouse to show. 


Each paper was inked with ColorBox Chalk Ink in Harvest before adhering to the birdhouse.


I used Mod Podge as the adhesive and since the papers are heavy stock, they adhered to the wood smoothly, with no wrinkles.


For the front and back roof lines of the birdhouse, I die cut several Spellbinders ovals and cut them in half.  Each was then inked and  added to the roof creating an over-hang. 


The overhang helped covered the areas where the paper was a little short since the birdhouse is about 14" high at the point.


The roof shingles were created from assorted papers using Spellbinders oval dies, inked with Harvest Chalk Ink and then adhered in layers to the roof.    I spritzed some water on the shingles to make them more realistic.


The birds are from the stamp set -  at Ground Level.  There were stamped in ColorBox Archival Ink in Mudslide, fussy cut, and placed atop some moss which I put inside the birdhouse.


This was an amazing project to create made that much better by the wonderful papers I was able to use. 

Thank you to Susan K. Weckesser, Inc. for giving me the opportunity to be a guest designer this month.  And thank you for stopping by today.


Steph

Wednesday, October 30, 2013

One play, two projects.

Hello there, it's Jaine here again with the second of my two posts as Guest Designer and today I'm bringing not one but two projects from the same technique but with very different results.

I absolutely love it when a play session can result in several different finishes and that's just what I got when I decided to get out my Gelli plate and the Autumn Grunge  Leaves stamps by Unity.


After brayering acrylic paint onto the Gelli I stamped the leaves onto the surface. I started with a piece of watercolour paper already painted with a green acrylic paint colour. As I stamped the leaves into the paint, I then re-stamped them onto the painted paper to a) clean some of the paint off and b) so as not to waste a good opportunity to get a good print of the leaves. (Wash the paint off your stamps straight away otherwise the paint might dry on the stamp and ruin them for ever!).

I then laid the other half of the watercolour paper on the plate to get the print. I only have a small Gelli plate that's why I can only print small sections at a time but I rather like that duo tone effect across the page. 


To finish my page I stamped the leaves again this time with a Versafine ink in brown and used Susan's border stencil and a black pen to scribble the border and numbers. The heart and it's negative came from the second part of my play session.

Once I'd cut my paper down to fit my journal page I had an off cut from the side which I'd stamped my leaves onto. I took this piece and cut it into a tag using a Sizzix die and used several colours of Distress inks to blend over the tag. The acrylic paint from the leaf prints resisted the ink and the more I put on the more they 'popped' out. With some more of this off cut I did the same and cut the heart and this frame to go with my journal page.


I gave my tag a Halloweeny theme with some black ink and ribbon and used the stencil once again to add some detail.


Have a spooktacular Halloween and get playing.

Jaine x


Thursday, October 17, 2013

Happy Autumn

Hello there, I'm Jaine and I'm thrilled to be bringing you my first post as a Guest Designer for Susan. I stress Guest as I've just been given one of the spots on the full time DT which I'm absolutely over the moon about. Anyway let me get on with a little bit of background.

I live in Luxembourg, a small country in the heart of Luxembourg which is almost totally covered with forest. At this time of year it's absolutely glorious with Autumn colours starting to take over throughout the forest. 

I've tried to capture some of those colours in a door decoration made using the 'Autumn grunge' stamp set for Unity.


To make my wreath I stamped the leaves with chalk inks from Color Box onto coloured card. I tried to stamp tone on tone for subtle colour play.


I spent time cutting out all those leaves which took a little time but was really worth the effort. I scrunched each leaf up in my hand and distressed the edges and creases with Vintage photo Distress ink.


The next stage was to cut out a ring of cardboard using two plates for a template. 


I used my glue gun to stick the leaves all around the circle. 


The finishing touches were some ribbon, wire and a touch of Smooch Glitz for a bit of sparkle.


 It's now hanging on my front door to welcome the season.

Thanks for reading and happy Autumn to you.

Jaine x


Tuesday, September 17, 2013

Bloom Where You're Planted

I am a stay at home mom.

The first time I was able to say that was 8 years ago and like so many who thought they knew it all, I thought it would be a breeze. BOY...was I wrong.

It was HARD! Aside from the day to day job of caring for a child and a house, I felt like I was slowly losing my identity. Most of my conversations were spent trying to interpret the ramblings of a 2 year old, while trying to figure out how the heck June Cleaver did it all it heels, pearls and a perfect head of hair, while I couldn't seem to get out of my PJs.

I didn't know who I was anymore or what I was suppose to be when I "grew up."

Fast forward 8 years....4 months ago I quit my job that I had had on and off, full-time/part-time for the last 5 years, so once again I am a stay at home mom, but...I think I've matured in the last 8 years.

I've made the conscious decision to not let WHAT I DO define WHO I AM. Yes...I might joke that I am a chef, maid, laundress, snot-wiper, drill sergeant, elementary tutor, etc, etc, but above all that...I'm a MOM. I get the amazing PRIVILEGE of building up these little people and having hands on influence on the next generation of the human race. That's pretty powerful stuff if you ask me.

My project today is for those of you who were like me...wondering why you're in this job or that situation...wondering why your "stuck" here or there. Try...for just a moment not to ask "why?" and just look at wherever you are as an opportunity! To grow as a person, the learn new things, to help others. There is a reason you are there and you can GROW and BLOOM where ever you are, if you choose to.


I combined the house from Susan's paper and stamped images of little houses using Susan's stamps for Unity Stamps to make a little neighborhood. I surrounded my neighborhood with fussy cut flowers, making my houses "bloom" in a beautiful garden! I felt like this really followed my idea...I am GROWING in my own HOME!


  I used Prima Marketing's crackle stencil to add pink texture to my background.

Hanging above my neighborhood garden are glittery, shimmery clouds!

I wanted to accent the LOVE in our house by accenting the hearts on the little house, so I added Ranger's Glossy accents.


I wanted the whole project to be very dimensional, so I used this little trick: instead of using 3-D "pop dots" (which we all know are not the stickiest or very permanent), I simply layered 1-3 small pieces of corrugated paper to give my projects tons of levels!


I hope you enjoyed my little project! I enjoyed making it for you!

You can find me in cyberspace here:
Instagram: thecreativelifestudios
Facebook: www.facebook.com/thecreativelifestudios
Twitter: thecreativelifear
Blog: www.thecreativelifear.blogspot.com

Have a blessed day! 

XOXO
KERI


Friday, June 28, 2013

a card and a tag


Hi everyone....I wanted to share a card today using Susan's Motherhood stamp. it is such a true statement combined with a great vintage image. being a mother of 4 and watching my 3 girls be mothers-Mother is definitely an action word and way of being even if it is just listening.

I took cardstock and stamped Unity stamp co stamps (layers of life set for May) for a background. I also used stencils with heavy bodied acrylic paint (parchment) to create a little depth.
i finished it off with a bow from leather cord and i used some color box chox ink around the stamped image and the cardstock.


 my next project is a tag using Susan's  A little bit Washi  stamp set. I stamped it on the cardstock tag and on some Tim Holtz tissue tape to add color. I then added one of Tim's frames on the smile stamp to highlight it. finished it off with a little chalk ink around the edges and seam binding stained with walnut stain


happy creating art from the heart, 
jeanie dickinson
lets journey awhile together and be inspired to create the moments of our LIFE. 

Tuesday, June 18, 2013

Poised and Pretty samples


Hi my name is Jeanie and i am a lucky girl to be with you today. my first project is a charm i made from Susan's Poised and Pretty stamp set and added it to a necklace i made.


next I wanted to share two cards I made using the Poised and Pretty stamp set also.

 the first card is business envelope sized. i used a download from the http://thegraphicsfairy.com/ I layered it with some pattern paper i made-- i stamped the lady on it. then i stamped her on cardstock and painted her added one of the dresses that i stamped on scrapbook paper...fussy cut and used foam tape to mount her. a little black ribbon and a favorite dr. seuss saying...I gave this to a daughters friend who just graduated.  


this next card is a favorite of mine- it is on a craft card. i layered scrapbook paper and Susan's Poised and Pretty girl with her red dress (made by stamping right on the patterned paper and cut out). i stamped one of the Poised and Pretty dresses on WRMemory 6x6 Anthologie papers, stained the silk seam binding with faded jeans stain by tim holtz, made a charm to hang on it, layered flower print from WRMemory 6x6 Anthologie pad and one i designed from my boys to men digital kit.

i also used some ink from color box {Clearsnap} around the edges.


Thank you Susan for letting me be here and sharing....next time i have some projects using more of Susan's stamp sets that can be found at http://unitystampco.com/product-category/stamps-by-mixed-media-artists/susan-k-weckesser-artisan/

happy creating art from the heart, 
jeanie dickinson
lets journey awhile together and be inspired to create the moments of our LIFE.

Thursday, May 30, 2013

A is for Art!

Or in this case, it stands for Aili, my daughter.  (It rhymes with smiley, in case you are wondering!)

Hello, everyone!  It's Sue Sykes here today, a little bittersweet that this is my last day to share a project as a Guest Designer with the Susan K. Weckesser team.  Susan and the ladies have been wonderful and welcoming, and I'd like to send them all a little note of thanks!

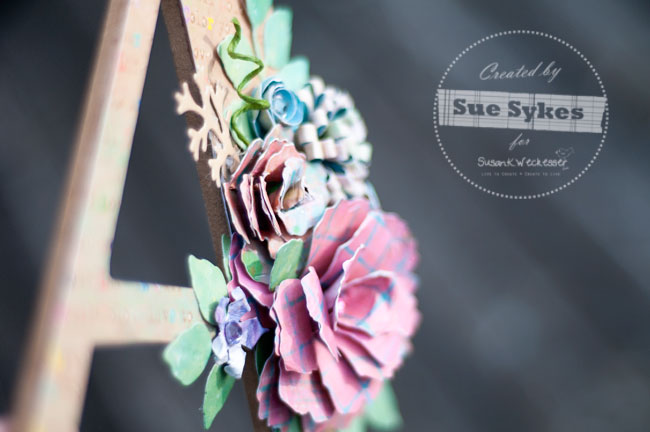
Today, I'm going to share an altered project with you.  I have a box of "alterable" items that I keep for when inspiration strikes.  I found this thin wooden alpha in there - I had purchased it a while ago at Michael's during a US shopping trip.  I knew I wanted to alter it for Aili's shelf in her room but wasn't quite sure what to do.  Susan's whimsical papers were perfect!

Supplies used:  Wooden letter; Susan K. Weckesser Whymsical Paper; Plaid ModPodge; Sizzix Tim Holtz Alterations die (Tattered Florals); Spellbinders die (Foliage); My Favourite Things Dienamics dies (Loopy Bloom, Large Rolled Rose, Rolled RoseMini Rolled Roses); Recollections paper tape, wire, rhinestones; water mister; hot glue gun.

I covered the letter with patterned paper and ModPodge.  While waiting for it to dry, I cut all of my flower pieces and foliage from various papers and created my flowers.  Once the flowers were completed, I adhered them, one at a time, beginning with the largest flowers.  After all the flowers were in place, I tucked in my foliage as needed, and added rhinestones as accents to a few flowers.


The corkscrew tendrils were created by covering thin wire with green paper tape and curling around the handle of my paper piercer.  So easy and adds great texture!


Here's a view from the right and left sides.


Thanks again to Susan and her team for their kindness and inspiration over the last few months!

Cheers,


My blog:  Kewl Beans

ShareThis2

BrendaPInnickColorCafe