Showing posts with label Colorbox Color Pop. Show all posts

Friday, December 16, 2016

Scraps and a Tag Card

  I love tags.  Tags to hang on things.  Tags as stand alone art.  Tags added to a card.  Today I am using more goodies from my scrap bin.

I stamped a tea stained tag with the owl from the Going Wild stamp set.

The little tiny heart is from the Heart-FULL Homes stamp set.


I cobbled some tiny colored paper strips out from the side of the tag and hand-lettered my sentiment.


I added a scrap of ribbon.


And used a brush to brush some color with Perfect Pearls along his feet.


What fun things can you make with some bits and scraps from your scrap box?

Brooke Bock from the Susan K. Weckesser Design Team

Sunday, November 13, 2016

Live In Color Tag Ornaments

Hi Friends!  Joyce Shaulis here today with another November tag project.  For this project, I recycled drink coasters and turned them into ornaments.  There are a variety of shapes available anymore, so that makes it more fun.  For these, I used ones that were 4" x 4". 


To begin, I cut out four images from the Live in Color Tag scrapbook paper. 


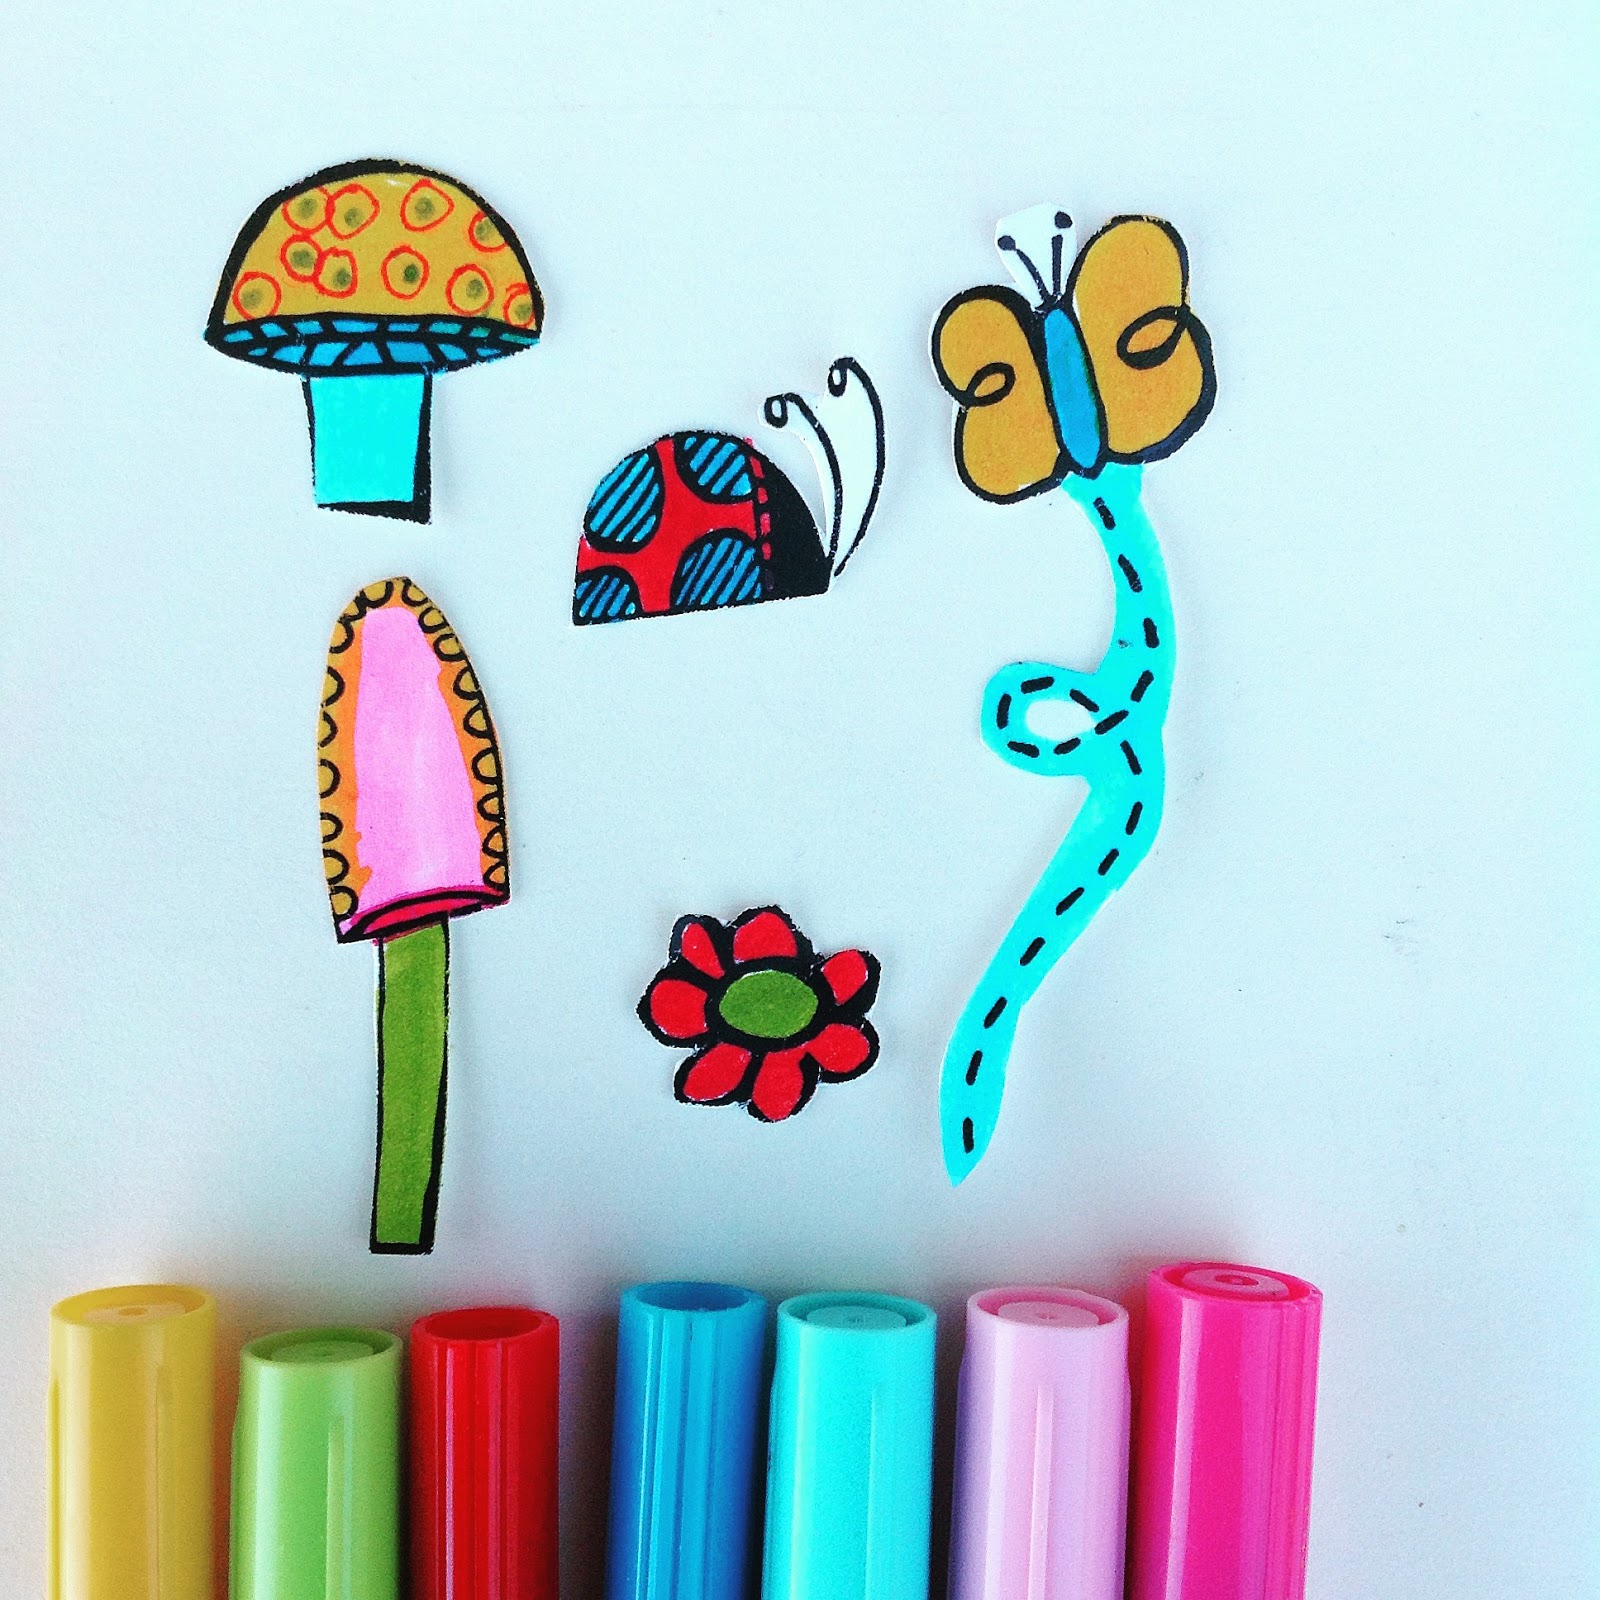
I stamped onto white cardstock with Mystery, color POP mini ink and the stamp set, Unicorns and Rainbows.  I also used some of the mushrooms, flowers, and bugs from the What's Up Gnomey? set. 


I used markers to color in the Unicorn and Rainbow images and cut them out. 


I also colored in mushrooms, flowers, a butterfly, and a ladybug from the What's Up Gnomey? stamp set and cut them out. 


Using Decoart's Decou-Page and an old paintbrush, I glued the tags onto the four coasters.  Then I glued the cut out images with Decou-page on top of the tags. 


Next, I took the mini POP inks and swiped the edges of the coasters.  For these four, I used Kiss, Fresh, and Ice. 


With a charcoal pencil, I outlined the images and the lines on the tags.  I smudged lightly with a Q-tip.  Then I coated all the coasters with the Decou-page.  After drying, I coated them all with Ultra-Matte varnish. 


Choosing from my sequin and jewel stash, I glued an assorted variety onto the coasters with white glue. 


I then used a paper punch to punch two holes into the upper corners.  Then, I used a 12'-14" piece of ribbon to tie in the holes, making a loop in the center of the ribbon.


These can be used as tags and double as ornaments.  I think they'd be a cute addition for a birthday or baby present.  I hope you enjoyed my project and that it will give you some ideas to recycle those drink coasters.
 
 
Joyce Shaulis        Susan K. Weckesser Design Team Member
 
 
Susan K. Weckesser products:
https://www.unitystampco.com/  Unicorns and Rainbows, What's up Gnomey?
https://www.clearsnap.com/ Mini POP inks in Fresh, Mystery, Ice, Kiss
Live in Color scrapbook paper
 
Other Products Used:
https://decoart.com/   Decou-Page, Ultra-Matte Varnish
https://kuretakezig.us  colored markers
white cardstock
white glue
paper coasters
assorted ribbons, jewels, sequins
charcoal pencil
scissors, paper punch
Q-tip


Tuesday, October 4, 2016

Home Canvas Panel

Hi everyone, Steph here today.  Can you believe it's October already?  This month it's all about mixed media so I've created this cute Home Canvas.


I've started by stamping an assortment of Unity stamps from the Tumbleweed Houses and Fly Away stamp sets.

 
Using  Colorbox® Color Pop Archival Dye Ink by Susan K. Weckesser in Mystery, I stamped all the elements on the panel.
 
 
Using a waterbrush, I then used  Colorbox® Color Pop Premium Dye Ink by Susan K. Weckesser.  I brushed in Ice Ink for the Sky, Fresh Ink for the grass and Cocoa Ink for the pathways.


I stamped the butterfly and flowers from the What's Up Ghomey? stamp set, coloring them with Kiss and Ice.  Then I continued brushing in colors to finish the canvas. 

 
I used some Clearsnap Smooch Accent Inks to add color to the windows and flowers.  Finally I stamped the phrase with Mystery ink, masking off the first few words.


Thanks for stopping by today.

Steph Ackerman
for Susan K. Weckesser


Wednesday, September 14, 2016

Soul of a Gypsy

Hello friends. 
Have you seen the new Mermaid Stamp that the Fabulous Susan K Weckesser created???
The Spirit of a Mermaid.


I absolutely love this new set. I stamped the mermaid on a piece of 110 lb white cardstock and colored her using Copic markers. 


I cut the image out carefully using a pair of detailed scissors. I stamped the sentiment from the same set on a piece of white cardstock and colored it with the same color of Copic's I used on the mermaid.
I found this piece of pattern paper that matched it perfectly. I had to add some glitter so I did. 


This was just a fun to make. I am going to be using this stamp so much. Thank you for stopping by today and checking out my post. Have a wonderful day friends.
Susan K Weckesser Products:
Colorbox Color Pop Archival Dye Ink by Susan K Weckesser
Spirit of a Mermaid

Other Products Used:
Copic Markers
Pattern Paper
Tombow Mono Multi Glue
ATG
Spectrum Noir Clear Glitter Pen


Saturday, September 10, 2016

"Friends Forever" Friendship Card


Hi Crafty Friends!  Joyce Shaulis here today sharing a quick and easy friendship card with you using Susan K. Weckesser's fabulous ink, stamps, and scrapbook paper. 

This week I had the wonderful opportunity to spend the day with my two best friends that I've known since elementary school.  I won't tell you how many years that's been, but we did the math and it's a lot!!!  For this card, I used a photo of myself with my one friend from 1982.  I will be happy to send her this card as we cherish our years of memories. 


To start, I made a card using light yellow cardstock measuring 5 1/2" x 4 1/4" when folded.  Then, I cut a piece of the "Live in Color" scrapbook paper 5" x 4", using the green back side.  Then, I cut out two flowers from the same paper from the front. 


Next, I stamped with Mystery mini POP ink and quotes from the Insta-Cute stamp set onto yellow cardstock. I also stamped the framed image onto light yellow cardstock, also with Mystery.  Then I cut these images out and edged them with Mystery ink. 


I then edged the two flowers, the card, and the green background piece with Mystery ink. 


I copied my original photo and cut it to size to fit in the desired place.  I glued each layer down using mini glue dots.  I also cut tiny flowers from the "Live in Color" paper and edged them in Mystery.  I attached those with mini glue dots also.  I added an additional sentiment inside the card. 


Thank you for allowing me to share my friendship memory and card with you today.  Be sure to share a card, a call, or a special gift with a good friend today.  Friendships are a true treasure. 
 
 
Susan K. Weckesser products:
 
"Live in Color" scrapbook paper
Mini POP inks - Mystery  https://www.clearsnap.com/
Insta-Cute rubber stamp set https://www.unitystampco.com/
 
Other products:
 
Mini Glue Dots http://www.gluedots.com
Yellow and light yellow cardstock
Copy of a personal photo
 
Joyce Shaulis       Susan K. Weckesser Design Team Member


Monday, August 22, 2016

Sunny Journal Page


Today I've created a journal page that's a homage to our wonderful Creative Team leader, Susan K. Weckesser herself. Susan is quite the most positive, upbeat and optimistic person I think I have ever met. So my words on this page remind me that she always sees the good in every single day including the bad, hard ones; even on the darkest days, the sun still rises. Thank you Susan for being an inspiration!

It's quite pared down (for me anyway!) as I wanted the beautiful stamps to take centre stage here. I really love both sets I used here!

Susan K. Weckesser Inc products used:
Fly Away stamp set by Unity
Grunge Fun stamp set by Jillian Vance
Colorbox Color Pop Inks: Ice, Sky, Mystery, Snow

Here's how I made it:
1) Repeatedly stamp the dots from Grunge Fun in Ice ink onto a journal page. Apply the stamp randomly without using an acrylic block, as you don't want full coverage. Repeat using Sky ink, but more sparingly, and using the second impression to get variations of colour tone.

2) Ink a piece of card with Ice ink and stamp two clouds with Sky ink. Cut them out. Stamp the sun onto painted card with Mystery Ink, heat set, cut out and add some additional colour with an orange pencil. Sponge the clouds with a little bit of Snow ink to make them look 'fluffy'.


3) Stamp the clouds and sun onto the background with Mystery ink and glue the cut out images over the top. Extend the strings with black pen as necessary.

4) Hand write your journaling as desired (tip - I can't write nicely so I pick a lovely font, print it off on thin printer paper, trace it with pencil onto my page then go over it with permanent pen. It looks like I wrote it! Yep, I cheated folks!)


I hope you like my journal page and that you've had a sunny day today :).

Katy x


Saturday, August 20, 2016

Everything Happens For A Reason Journal Page With Clearsnap Color Pop Mini Inks

Hi all 

I have another art journal page to share using Susan K Weckesser Stamps and Clearsnap Color Pop Mini Inks. It is a simple page that i started off by using the Sky and Ice inks to paint a blank page a two tone color. I blended them in a little so it didn't look too clean.


Next i stamped the Itty Bitty sentiment in the middle and colored it in with the Color Pop Mini Inks.


I then used the In Circle Me stamp and i inked just around the one edge of the stamp before applying it around the edges of the journal. I then colored in the circles with the Color Pop Mini inks.


Thank you for visiting. 

Friday, August 12, 2016

Unicorns and Glitter!


Not my usual style, but I have to admit I love this whimsical little Unicorns and Rainbows stamp set. It's just packed with adorable little elements!


The challenge this month for the CT is journal pages. I have a couple of journals - one is A5 but I also have a teeny weeny little one I got in Jo-Ann's last time I was in the States. I love the size of this because it's quick to create and also I can take it with me when I travel.

Here's how I made it:


1) Coat the page with gesso and when dry stencil the raindrops with modelling paste.

2) When the paste is dry, spray inks (I used two colours) and tilt the page to let them drip down. Dry with a heat tool. Repeat if desired.

3) Replace the stencil over the modelling paste and ink through with Colorbox Ice ink to tint the raindrops.

4) Colour and cut out the stamped images and glue in place. Add some touches of glitter to the stamping and some doodles to the page to finish.

Hope you like this little cutie!

Katy x


Products used:


Susan K Weckesser for Unity Stamp: Unicorns and Rainbows
Susan K. Weckesser Colorbox Color Pop Ink: Ice
Raindrop stencil (That's Crafty)
Modelling paste (DecoArt Media)
Stickles: Stardust
Alcohol markers
Blue ink sprays
Black inkpad

Thursday, August 11, 2016

Mini Tag Journal Using At Ground Level Stamp Set from Susan K. Weckesser

 Hello Folks!

I am thrilled to show you this fast and easy tag book I made this month.

I am still enjoying my new studio space.  It is a great place to create.  Many of my supplies and tools are right at my fingertips which makes creating easy and fun.


I started by stamping some shipping tags with 

Colorbox® Color Pop Premium Dye Ink by Susan K. Weckesser in Fresh.  For the first one I stamped directly on the tag.  For subsequent ones I stamped my acrylic block and then pressed my tag onto it.  I used a baby wipe to smear the color all over the tag before it dried (and to clean up my block).  Then I wadded up my tag and smoothed it out.


 Next, I used stamps from the At Ground Level set to stamp each tag. I added word stamps from the An Artful Ornament stamp set for one of the pages as well.


Then I just had fun by adding some extras with the Doodle Stencil, trims, and some more of the 

Colorbox® Color Pop Premium Dye Inks by Susan K. Weckesser. I used a tassel from my trims box and a piece of ribbon I removed from some flowers to loosely tie the tags together.


This would be such a fun project to do with your kids one afternoon.


I love shipping tags.  I buy them by the huge boxful from office supply stores.


I often tea dye them though I actually use coffee. I also dye them using dye and a ziploc bag.  I do them in large batches so they are ready to go when inspiration hits.


For this project I used:
Lace scraps
yarn scraps
 pieces of ribbons

Colorbox® Color Pop Premium Dye Inks by Susan K. Weckesser

At Ground Level Stamp Set
An Artful Ormanment Stamp Set
glue/adhesive
Scissors


Brooke Bock, member of the 2016 Susan K. Weckesser Design team.

ShareThis2

BrendaPInnickColorCafe